 Download PDF· Rev 1.0.0
User Guide
AERL Link
Configuration Software for Windows
SRX · SRX-R · EG-600 · EG-600-SC
User GuideRev 1.0.0, 8 Nov 2026
Download PDF· Rev 1.0.0
User Guide
Configuration Software for Windows
This guide is for installers and service technicians who set up and service AERL products with AERL Link. It covers installing AERL Link, connecting a unit, every page and setting AERL Link shows for each product, calibration, firmware updates, settings files, the support bundle and troubleshooting.
What each setting should be for a particular site comes from the product's user manual and the battery manufacturer. Read the product manual before you change a unit's settings: this guide explains what AERL Link does, the product manual explains what the product does.
AERL Link is updated from time to time. Use the latest AERL Link: the pages in this guide are from the current release, and an older release can look different. The screenshots show AERL Link's demo units, so the readings in them are examples only.
Windows is a trademark of Microsoft Corporation. Other names are trademarks of their respective owners.
AERL Link is AERL's configuration software for Windows. It connects to an AERL unit over USB and lets you:
| Product | Connection | Pages in AERL Link |
|---|---|---|
| CoolMax SRX | USB-B | Status, Output (charge profile), Comms, Calibrate; firmware update |
| CoolMax SRX-R | USB-B | Status, Output (charge profile), Comms, Calibrate; firmware update |
| EarthGuard EG-600 | USB-C | Status (two test circuits), Settings; firmware update |
| EarthGuard EG-600-SC | USB-C | Status (one test circuit), Settings; firmware update |
Each time AERL Link starts, it checks for a newer release. When there is one, it shows the new version and asks Would you like to update now? Accept it: a newer release can be needed to update a unit to its newest firmware, and it carries AERL's latest battery presets and help.
The version you have is shown at the top of AERL Link's SETTINGS page.

AERL Link releases published before mid-2026 check an earlier update address and never offer the current release. If AERL Link has not offered an update for a long time, install the current release from the download page.
Windows normally installs the USB driver the first time a unit is plugged in. If AERL Link does not detect your unit, download and run Install Drivers.exe from the AERL Link download page, then unplug the USB cable and plug it in again. The same driver works with every AERL Link release.
AERL Link finds a unit by itself within a few seconds of the USB cable going in. There is no COM port to choose.
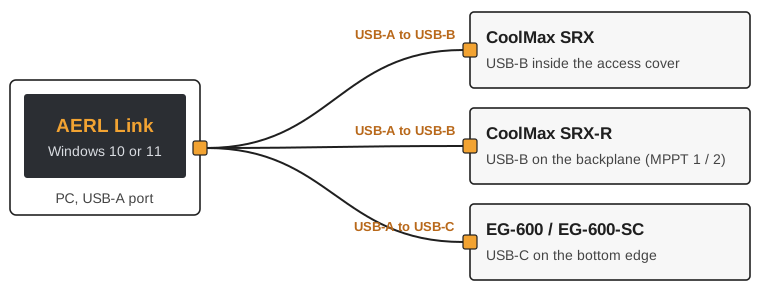
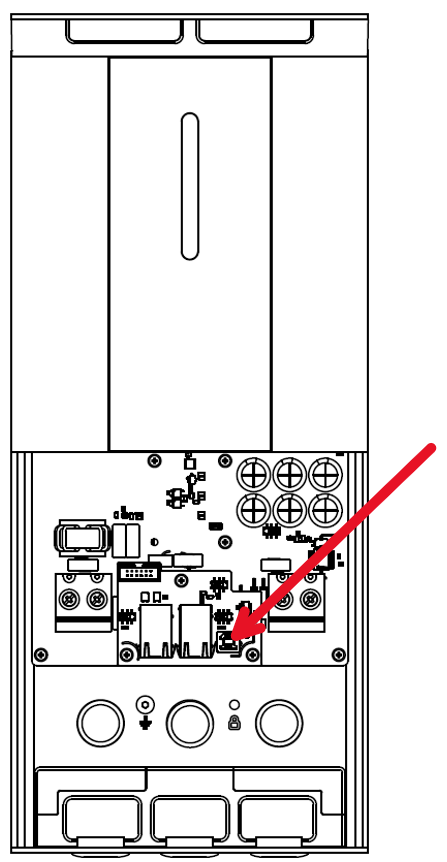
CoolMax SRX. The USB-B port is inside the access cover, on the internal board. Remove the access cover as the SRX user manual describes, and plug in the USB cable.
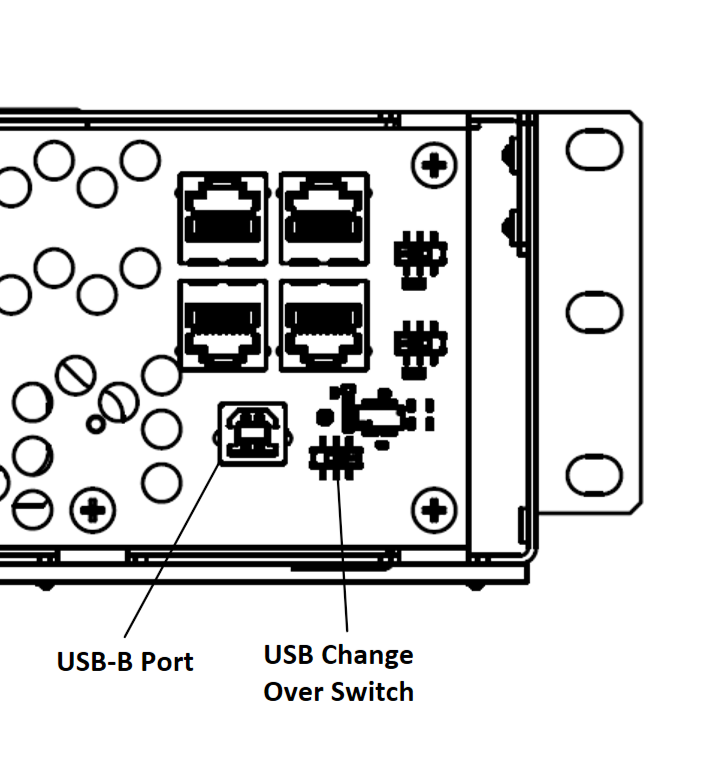
CoolMax SRX-R. The USB-B port is on the backplane board, beside the USB Change-Over Switch. Only one module talks over USB at a time: set the switch to the module you want to connect to (MPPT 1 or MPPT 2). To connect to the other module, change the switch over; AERL Link then lists the other module.
EarthGuard EG-600 and EG-600-SC. The USB-C port is on the bottom edge. The EarthGuard can be powered from the USB-C port alone (4.5–5.5 Vdc), so you can set one up on the bench before you install it.
A CoolMax SRX or SRX-R must be powered up to talk to AERL Link: follow the start-up procedure in its user manual. For a firmware update or a calibration, the battery must be connected.
AERL Link can have several units connected at once, each on its own USB cable. Each appears as its own card on the DEVICES page. Settings, calibration and firmware updates apply only to the unit whose page is open.
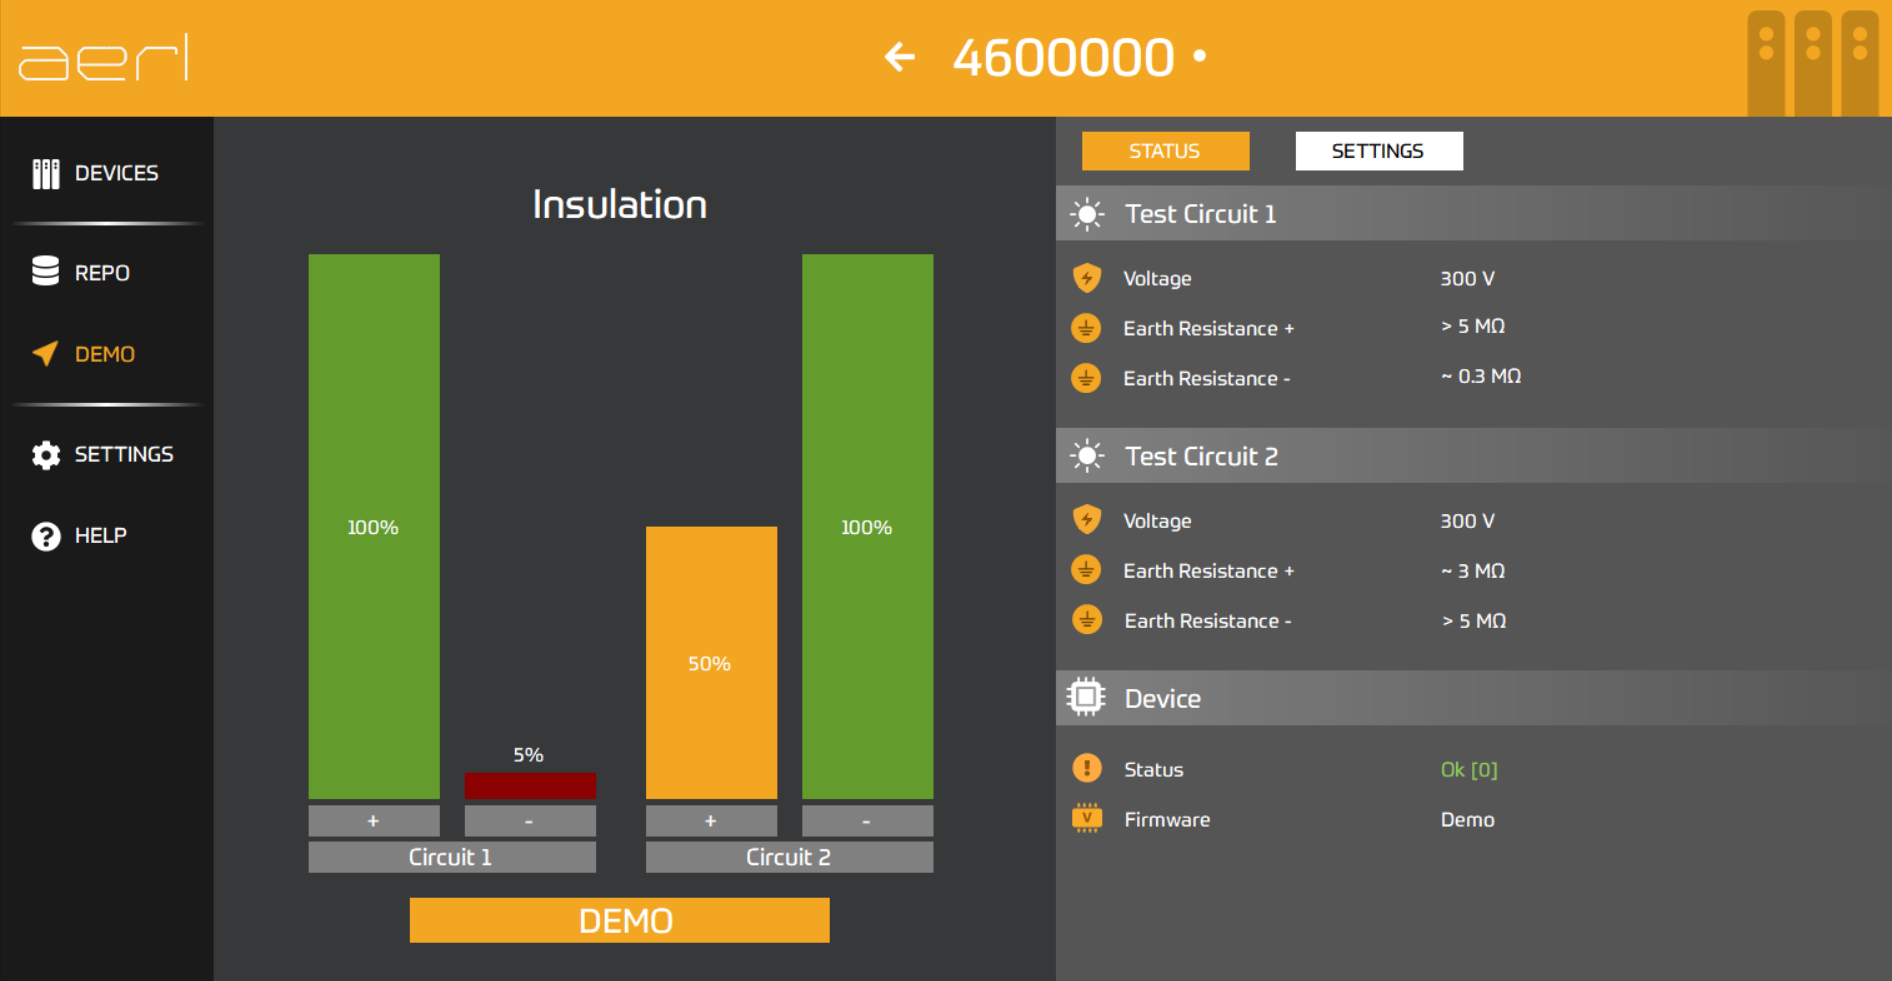
The menu on the left of the window opens AERL Link's pages.
| Menu | What it shows |
|---|---|
| DEVICES | Every AERL unit connected to this PC over USB (the LOCAL list). Click a card to open the unit. |
| REPO | The firmware AERL Link has downloaded from AERL and keeps on this PC (chapter 10). |
| DEMO | Demo units, one of each product, with example readings. Nothing you do on a demo unit reaches a real unit. |
| SETTINGS | AERL Link's own settings: the temperature unit, Beta firmware and the firmware lock (chapter 12). |
| HELP | The user manual for the connected SRX or SRX-R, the help tours, the support bundle and AERL's contact details (chapter 12). |
Each connected unit has a card that shows its name, model, serial number and firmware version. The card's colour follows the unit's status (section 5.2). Click a card to open the unit's page.
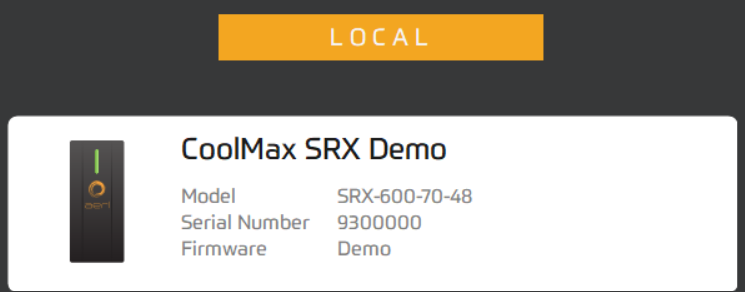
If no unit is connected, the page shows NO DEVICES FOUND and a TROUBLESHOOTING button, which lists the usual causes (chapter 13).
A unit's page opens on its STATUS tab. The unit's serial number is at the top; the arrow beside it goes back to the DEVICES page. The tabs depend on the product:
| Product | Tabs |
|---|---|
| CoolMax SRX and SRX-R | STATUS, OUTPUT, COMMS, CALIBRATE |
| EarthGuard EG-600 and EG-600-SC | STATUS, SETTINGS |
Changes on a settings tab wait on the page, flagged in orange, until you press Apply. Before it sends anything, AERL Link lists every change as before → after and asks you to confirm. The unit then restarts to take the new settings, and AERL Link reads them back to check that they were saved.

A demo unit's page shows DEMO and its firmware reads Demo. If you see these, you are not looking at your own unit: click DEVICES and open your unit's card.
The STATUS tab shows what the unit is doing now. It only reads: nothing on it changes the unit.
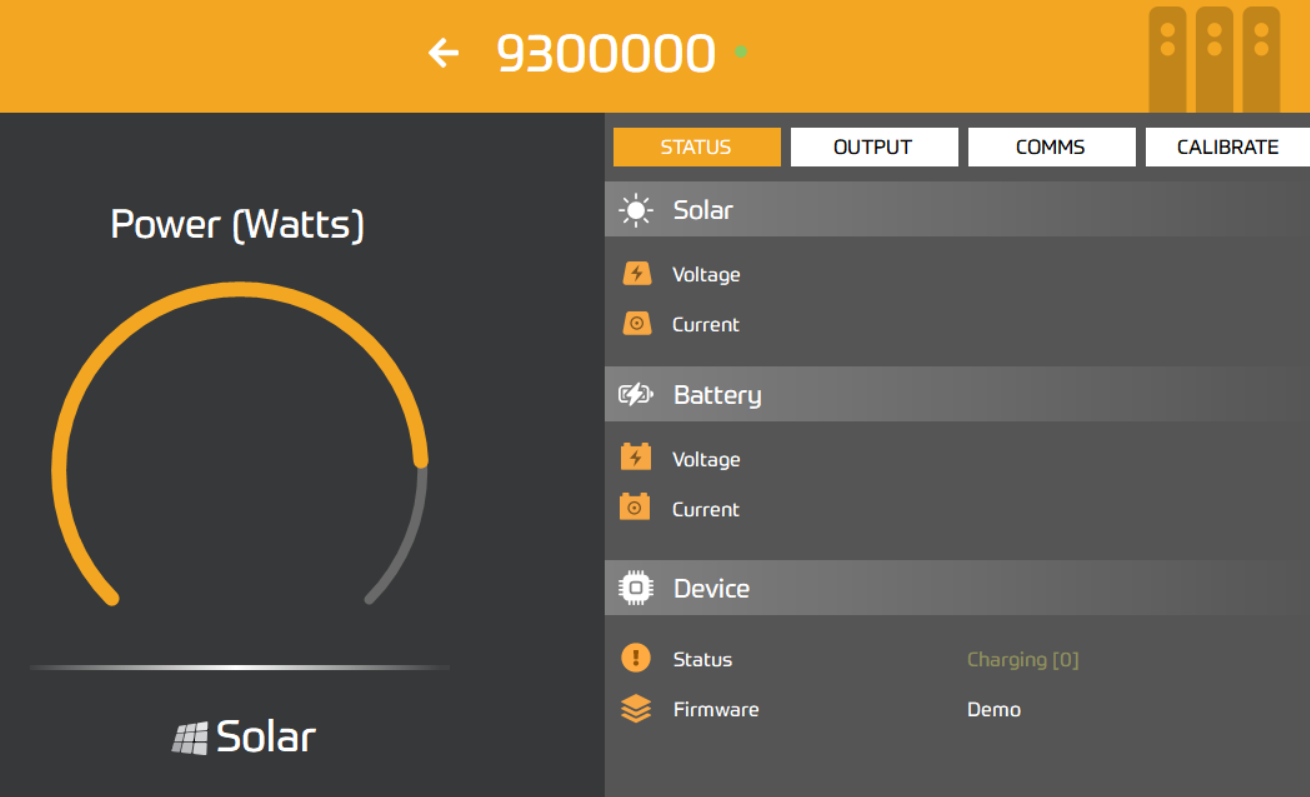
The status line gives the unit's state in plain words, with its code in brackets, for example Charging [0]. Its colour matches the unit's LED:
| Colour | Meaning |
|---|---|
| Green | Charging normally. |
| Blue | Waiting: starting up, asleep, or the sun is too low. |
| Orange | Needs setting up, or charging is held by a setting or by the battery. The unit is not faulty. |
| Red | A fault. |
Where AERL Link can say more about a code, a ? appears beside the status. Click it for what the code means, whether the unit will recover by itself and what to change. The full list of codes, with the LED patterns, is in the Troubleshooting chapter of the SRX and SRX-R user manuals.
| Status | Code | What to do |
|---|---|---|
| Not Set Up | −26 | The unit has no charge profile. Set one on the OUTPUT tab (chapter 6). |
| Starting Up | 100 | Wait: the unit is starting. |
| Sleeping | −1153, −1158 | The PV voltage is too low to charge: normal at night and at dawn and dusk. |
| Current Flow Disrupted | −1162 | The charge current stopped suddenly, for example a breaker opened. The unit restarts by itself. |
| Config Out of Range | −1160 | The battery voltage does not fit the charge profile. Check the profile is for this battery's nominal voltage. A deeply discharged battery also causes it. |
| Charge Held: Battery Voltage Limit | −1306 | Reported by some pre-release firmware: the absorption voltage is above the charge voltage the battery's BMS asks for over CAN. Charging resumes when the battery raises its limit. |
| Charge Held: Battery Current Limit | −1307 | Reported by some pre-release firmware. Contact AERL support. |
| Low Battery Temperature | −1103 | Charging is paused at or below the low-temperature cutoff. If no battery temperature is shown, the unit has none: turn the cutoff off (section 6.7). |
| Earth Fault Detected | −1401 to −1403 | Isolate the unit and find the earth fault (SRX user manual, Ground Fault Detection). |
| Unknown Status | any | AERL Link does not know this code yet. Update AERL Link, and quote the code to AERL support. |
The OUTPUT tab holds the battery charge profile and the unit's protection settings. Each value opens an entry box: change it with − and + or type it, then OK. Nothing reaches the unit until you press Apply.
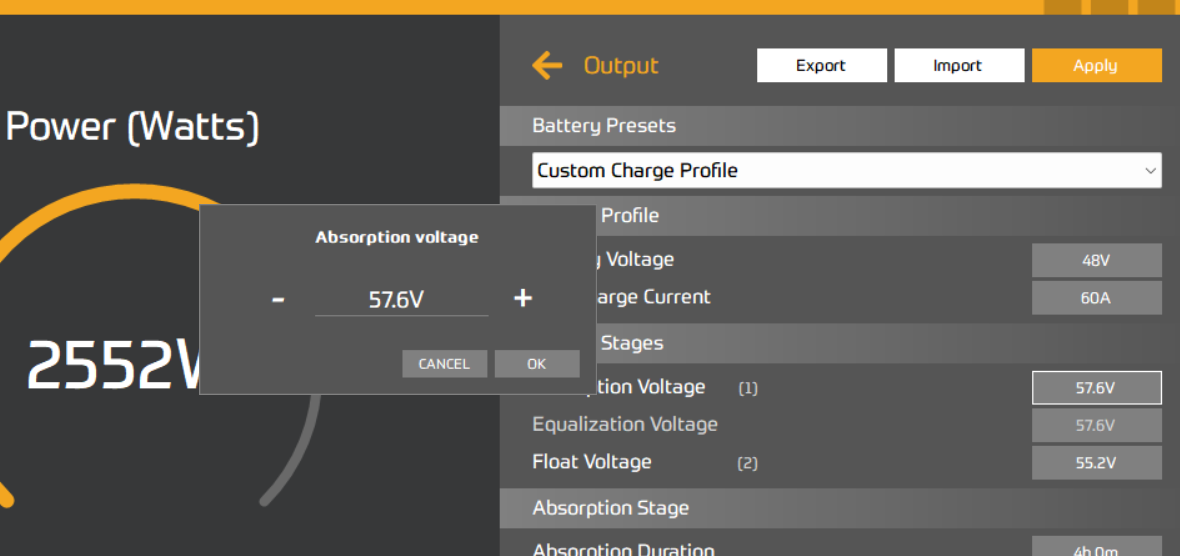
Set the battery preset or the battery voltage first: it sets the range every other voltage must sit in. AERL Link checks that the values fit together and suit the battery voltage before it sends them, and will not send a profile it cannot check.
Battery Presets lists AERL's profiles for common batteries. Choosing one fills in the charge voltages, the absorption time and the temperature compensation with AERL's recommended values. Custom Charge Profile keeps the values you set. AERL Link refreshes the presets from AERL each time it starts with an internet connection.
Check every value a preset fills in against the battery manufacturer's charge specification before you apply it, and set Max Charge Current yourself: no more than the battery manufacturer's recommended charge rate, and no more than the battery cables and fuse are rated for.
| Setting | What it does |
|---|---|
| Battery Voltage | The bank's nominal voltage. The 48 V models take 24 V or 48 V banks; the 120 V models take 120 V banks. |
| Max Charge Current | The most current the unit charges with. |
| Absorption Voltage | The voltage the unit charges up to and holds during absorption. |
| Equalization Voltage | The voltage for an equalisation charge (below). |
| Float Voltage | The voltage the unit holds the battery at once it is full. Below absorption. |
| Absorption Duration | The longest the unit holds absorption before it goes to float. |
| Tail Current | Absorption ends early when the charge current falls to this: the battery is full. |
| Re-bulk Voltage | If the battery falls to this while floating, the unit starts a new charge cycle. Below float. |
The SRX and SRX-R user manuals (Battery Charge Profile chapter) show how the stages fit together.
Equalization Enabled, Equalization Voltage, Equalization Duration and Equalization Interval (days between equalisation charges) control a periodic over-charge for flooded lead-acid batteries.
Leave equalisation off unless the battery is flooded lead-acid and its manufacturer asks for it. Equalisation will likely damage LiFePO₄ and other lithium batteries.
Ground Fault Mode must match how the system is earthed: Floating Earth where nothing on the DC side is earthed, Positive Earth or Negative Earth where that PV pole is bonded to earth, Disabled only for commissioning and test. The wrong mode hides a real earth fault or reports a false one on the earthed pole. The SRX and SRX-R user manuals (Ground Fault Detection) describe each mode.
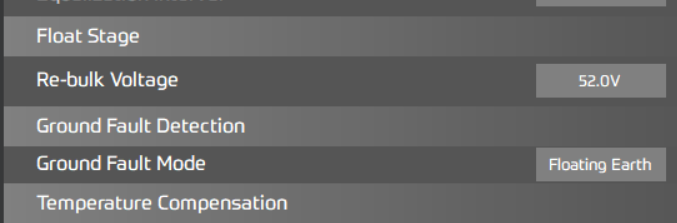
On firmware 2.0.1 and later the controller trips at a fixed 50 kΩ whatever the sensitivity buttons show. Units on earlier firmware had a Low / Mid / High sensitivity: update them to get the fixed 50 kΩ trip. Check that 50 kΩ meets your local standard.
Temperature Compensation lowers the absorption and float voltages as the battery warms, and raises them as it cools, by the amount set in mV/°C. The factory default is 50 mV/°C; lithium batteries usually need little or none.
Low Temperature Cutoff Enabled stops charging while the battery is below the Low Temperature Cutoff Point, which many lithium batteries need. It is off by default.
Temperature compensation and the low-temperature cutoff work only when the unit has a battery temperature: from a battery's BMS over CAN (for example an AERL LiFe²), or from an AERL Battery Sense. Without one, the unit charges to the uncompensated voltages, and with the cutoff on it reads the battery as 0 °C and holds charging (status −1103).
AERL Link shows temperatures in °C or °F, set on its SETTINGS page.
Blackstart Guard lets the unit start charging a battery bank whose voltage is below the unit's normal "no battery" threshold, such as a known-good lithium bank that has run flat. It is off by default. AERL Link asks you to confirm before it turns Blackstart Guard on, including when a settings file turns it on.
Use Blackstart Guard only to recover a known-good bank, and turn it off once the bank has recovered. Left on, the unit no longer refuses to run into a disconnected or faulty battery.
Output Enabled turns charging on or off. Leave it on for a working system; turn it off to hold the output off for maintenance.
If AERL Link reports that the unit did not confirm the settings, they may not have been saved: check the USB cable, wait for the unit to reappear, and apply them again.
The COMMS tab sets the unit's addresses and bus speeds for Modbus RTU (RS485) and CAN bus, as far as the unit's firmware allows (section 7.3). The SRX and SRX-R user manuals (Communications Protocols) describe the buses and their wiring.
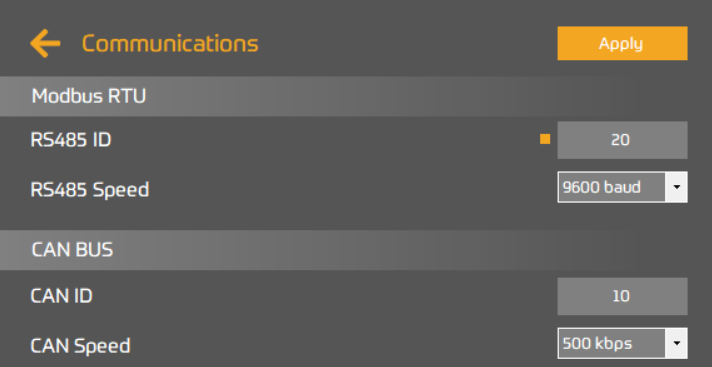
| Setting | Range | Default | Notes |
|---|---|---|---|
| RS485 ID | 1–90 | 20 | The unit's Modbus address. Different for every unit on the bus. |
| RS485 Speed | 9600, 19200, 38400, 57600, 115200 baud | 9600 | The same for every device on the bus, including the master. |
| CAN ID | 10–60 | 10 | The unit's CAN address. Units on a shared bus take a free ID automatically; 62 means not yet assigned. |
| CAN Speed | 125, 250, 500 kbps | 500 | The same for every device on the bus. |
Press Apply to send them. The unit restarts briefly.
A changed address or bus speed cuts the unit off from any master still using the old one. Change the master to match before you leave the site.
CAN ROLE sets how the unit takes part on the CAN bus. It is locked. Change it only with AERL support, who will give you the password for your site; it then opens with Unlock. The CAN role appears only on units that can use it.
The COMMS tab shows only the settings the unit's firmware can store. On the current SRX and SRX-R firmware releases it shows the RS485 ID (and the CAN role) only: the RS485 speed, CAN ID and CAN speed keep their values, and a unit on a shared CAN bus takes a free CAN ID by itself. Contact AERL support if a site needs other bus settings.
Every unit is calibrated at the factory. Calibration corrects the unit's battery voltage reading against your multimeter, so that the charge voltages are held where they are set. Calibrate when:
When a unit with solar input is first opened, AERL Link may show the battery voltage the unit reads and ask whether it is within 0.1 V of the measured battery voltage. Measure the battery voltage at the unit's battery terminals and answer. No starts the calibration.
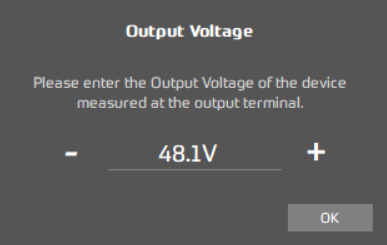
Do not unplug the USB cable or switch off power during calibration. If calibration is stopped part-way, AERL Link gives the unit back the calibration it had before and switches its output back on.
| Check | What it means |
|---|---|
| A battery is connected | The output must read at least 15 V and the unit must not report No Battery Detected. If the voltage falls below 15 V once the output is switched off, the earlier reading was the unit's own output, not a battery. |
| The entry is close to the unit's reading | The entry box accepts only a value near the unit's own reading. A meter reading far from it means the meter, the probe position or the battery connection is wrong, not the calibration. |
| The voltage holds steady | If the battery voltage moves by more than about 1 V while you enter the reading, AERL Link refuses it: something is still charging or loading the battery. |
| The result agrees with your meter | After the restart, the unit's settled reading must agree with your entry within about 0.2 V on a 48 V battery (about 0.4 V at the top of the 120 V range). |
| The values are in range | The unit accepts only calibration values within its own limits. |
| Message | What to do |
|---|---|
| Output voltage too low to calibrate or The device reports No Battery Detected | Connect the battery and close the battery breaker, then try again. |
| The battery voltage moved … while you were entering the meter reading | The unit was still charging or had just restarted. Wait for the battery voltage to hold steady, then start again. |
| Calibration accuracy check failed: the device's output voltage never settled | Something is still charging or loading the battery. Disconnect other sources from the DC bus and try again. |
| Calibration accuracy check failed: the device's voltage reading doesn't match your multimeter reading closely enough | Check your meter (range, battery, probe contact) and measure again at the unit's battery terminals, then try again. |
| Calibration values out of the device's accepted range | The reading would need a correction larger than the unit allows. Re-check the reading at the unit's terminals. If it is right, contact AERL support. |
If a unit's reading still disagrees with a known-good multimeter after a successful calibration, save a support bundle (chapter 11) and contact AERL support.
The EarthGuard's STATUS tab shows the insulation of each test circuit: the EG-600 has two, the EG-600-SC one.
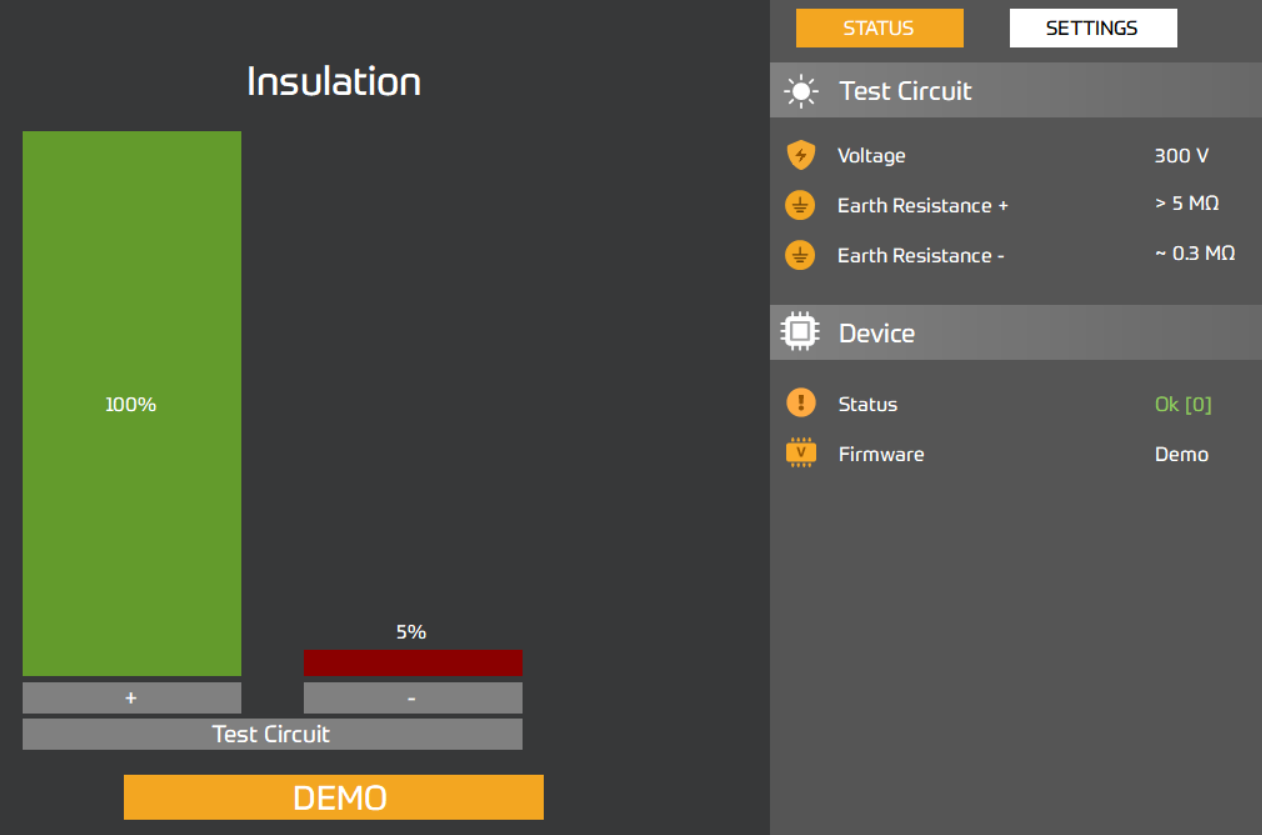
On some earlier EG-600 hardware, AERL Link marks the circuit voltage * Voltage readings can be subject to error. Use a multimeter where you need the circuit voltage.
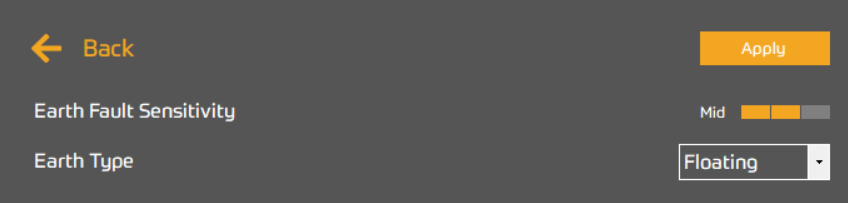
The SETTINGS tab has two settings. Press Apply to send them; the EarthGuard restarts to take them (about 15 seconds).
| Setting | What it does |
|---|---|
| Earth Fault Sensitivity | The trip threshold: High < 100 kΩ, Mid < 50 kΩ, Low < 30 kΩ. The default is Low (30 kΩ). On EG-600 firmware 2.2.1, the current release, the trip threshold is fixed at 30 kΩ whatever this shows. |
| Earth Type | Floating (default) where the DC bus is not bonded to earth anywhere; Positive or Negative where that pole is bonded to earth elsewhere in the system. |
Positive and Negative stop the EarthGuard monitoring the bonded pole. Use them only where that pole is deliberately and permanently bonded to earth; otherwise leave Floating. The EG-600 and EG-600-SC user manuals describe each mode and how to test the alarm.
The EarthGuard has no Comms or Calibrate tab. Update its firmware as in chapter 10.
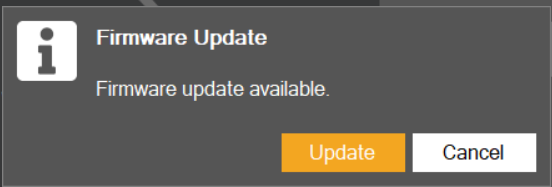
AERL Link keeps a list of AERL's released firmware, and the firmware files themselves, on the PC. When you open a unit's page, AERL Link compares the unit's firmware with the list and, if a newer release is available for that unit, offers it:
The offer names the unit and shows the release notes. If the update needs a calibration afterwards, the offer says so: go ahead only with a digital multimeter on hand.
REPO lists the firmware AERL Link has downloaded: one row per release, with the product, version, date and priority. AERL Link refreshes the list when it starts and every hour while it has an internet connection; Refresh checks now. Because the files are kept on the PC, AERL Link can update units on site with no internet connection.
Both are on AERL Link's SETTINGS page and need a password from AERL support.
AERL Link never downgrades a unit's firmware.
The AERL Firmware Update Guide covers every AERL product, including updates through AERL Cloud.
On the OUTPUT tab, Export saves the unit's charge profile to a settings file, and Import loads one, for example to set several units on a site the same way.
AERL Link records each unit's settings every time they change, on the PC. Undo and Redo on the settings tabs step back and forward through them: each step fills in the page with the earlier settings as pending changes, flagged in orange. Nothing reaches the unit until you press Apply.
If AERL support asks for one, a support bundle gives them what they need to look into a problem. Save it from the HELP page, or from the unit's own page.
AERL-support-<serial>-<date>-<time>.zip in Documents\AERL Link support, and lists what it contains. Open folder shows it.| The bundle contains | Details |
|---|---|
| A summary | AERL Link's version, the Windows version, and for each unit its model, serial number, firmware, hardware revision and status. |
| Each unit's settings | Every settings block the unit sent, and its settings history. |
| Each unit's readings and event log | The unit's last readings and its own event log. |
| AERL Link's logs | AERL Link's own log files. |
AERL Link sends nothing by itself: the bundle stays on the PC until you email it.
The HELP page has:
AERL Link has two short tours. Both run on a demo SRX, so nothing in them reaches a real unit. AERL Link offers them once, the first time it starts; start them again from HELP at any time.
Press Next to move on, or End the tour to stop.
| Setting | What it does |
|---|---|
| Temperature Unit | Shows temperatures in Celsius (C) or Fahrenheit (F). |
| Beta Firmware | Offers Beta firmware as well as Stable (section 10.6). Needs a password from AERL support. |
| Lock Firmware | Holds each product at a highest firmware version (section 10.6). Needs a password from AERL support. |
The page also shows the AERL Link version.
| Problem | Check |
|---|---|
| NO DEVICES FOUND | The unit has power, and the USB cable is plugged in at both ends. Unplug the cable and plug it in again, or try another cable: some USB cables carry power only. |
| Still not found | Run Install Drivers.exe from the AERL Link download page, then reconnect the cable. In Windows Device Manager, the unit should appear under Ports (COM & LPT) when the cable is plugged in. If it appears with a warning symbol, the driver is missing. |
| COM port in use | AERL Link scans every COM port by itself: there is no port to choose. If another program has the unit's COM port open (a terminal program, or a second copy of AERL Link), AERL Link cannot open it: close the other program, then reconnect the cable. |
| SRX-R module missing | Only the module selected by the USB Change-Over Switch is connected. Change the switch over to reach the other module. |
| SRX not found | The SRX must be powered up: see its start-up procedure. |
| Unit drops off during a save | A unit restarts after Apply: wait for it to reappear. If it does not, unplug and reconnect the cable. |
| Problem | Check |
|---|---|
| Readings look like examples; firmware shows Demo | You are on a demo unit (DEMO menu). Click DEVICES and open your unit's card. |
| Status shows Unknown Status | Update AERL Link. Quote the code in brackets to AERL support. |
| The unit did not confirm the settings | The settings may not have been saved. Reconnect and apply them again, then check them on the page. |
| No firmware is offered | Connect the PC to the internet and press Refresh on the REPO page, or start AERL Link again. A firmware lock (section 10.6) may be holding the unit at its version. |
| No firmware list yet | AERL Link has never reached AERL from this PC. Connect to the internet and open the REPO page. |
| AERL Link offers no update to itself | See chapter 2: an old installation may need the current release installed from the download page. |
| Calibration refused | See section 8.5. |
| A firmware update failed | Power-cycle the unit and try again (section 10.4). |
Before you call, note the product, its serial number and firmware version (on its card), the status code, and what you were doing. Save a support bundle (chapter 11) if AERL support asks for one.
AERL support: 1800 950 865 · [email protected] · aerl.com.au
| Revision | Date | Change |
|---|---|---|
| 1.0.0 | 11 / 2026 | First issue. |
If you have any questions or need support, contact AERL.
Sincerely,
The AERL Team
AERL Pty Ltd · 1/75 Bluestone Circuit, Seventeen Mile Rocks QLD 4073 · 1800 950 865 · [email protected] · aerl.com.au
Australian Energy Research Laboratories
1/75 Bluestone Circuit
Seventeen Mile Rocks QLD 4073
Australia