 Download PDF· Rev 2.0.1
User Manual
CoolPro
Cathodic Converter™
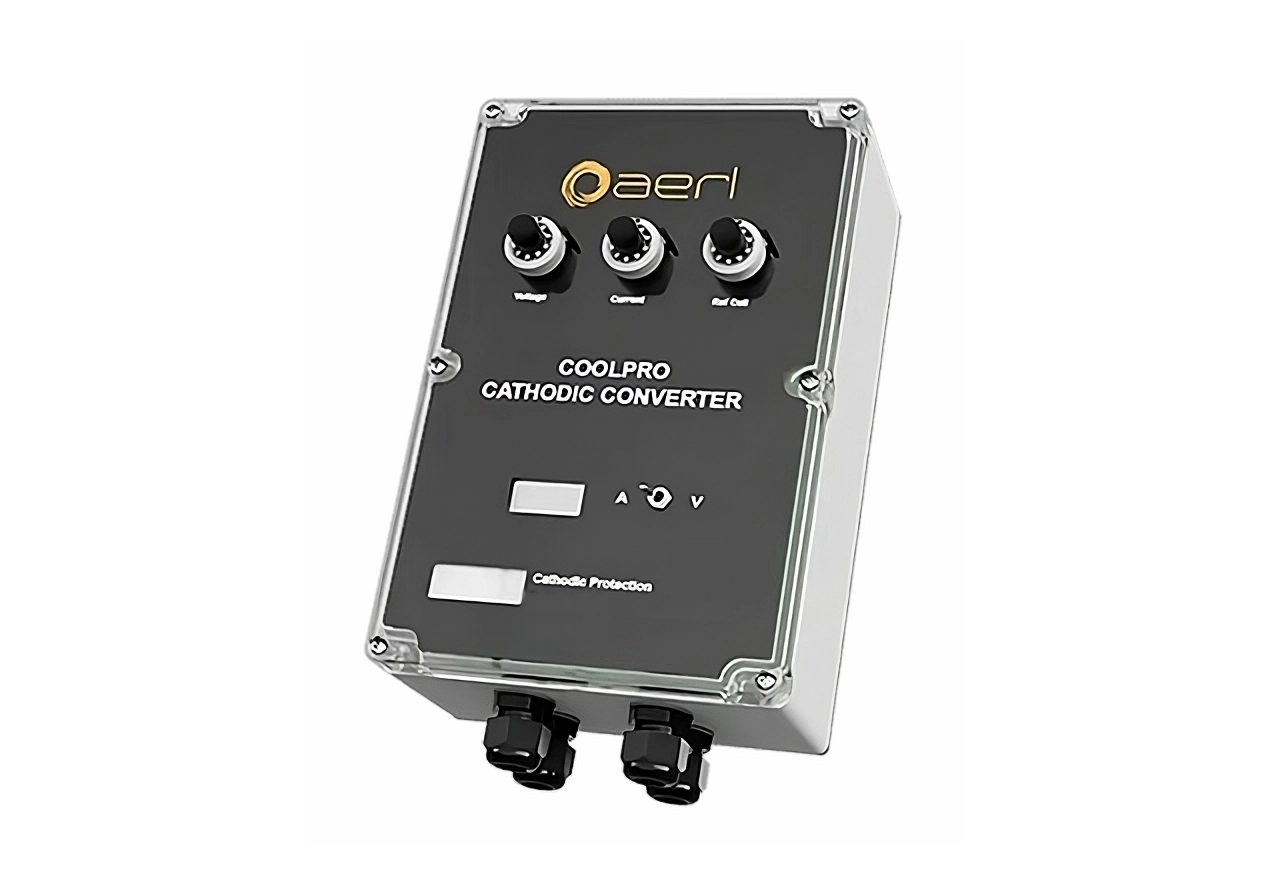
CP30
Installation & OperationAER04 Rev 2.0.1, 8 Nov 2026
Download PDF· Rev 2.0.1
User Manual
Cathodic Converter™
AERL Pty Ltd, its affiliates, agents, and employees, and all persons acting on its or their behalf (collectively, “AERL”):
(a) Disclaims any and all liability for any errors, inaccuracies or incompleteness contained in any datasheet or in any other disclosure relating to any product.
(b) Assumes no responsibility or liability for loss or damage whether direct, indirect, consequential or incidental, which might arise out of use of such information. The use of any such information will be entirely at the user’s risk.
(c) Reserves the right to change any AERL product, product specifications and data without notice to improve reliability, function or design or otherwise.
CoolPro Cathodic Converter™ User Manual © 2026 AERL Pty Ltd. All rights reserved. AERL reserves the right to periodically revise this document and to make changes to the content without notice.
This manual contains important safety information and installation instructions for the CoolPro Cathodic Converter™. It uses the following symbols for important operating information and potentially dangerous conditions.

Indicates information that must be followed to ensure proper operation of the CoolPro Cathodic Converter™.

Indicates a critical procedure for the safe installation of the unit, or provides safety information that is required to be followed.
| Model | Max anti-corrosion current |
|---|---|
| CP30 | 30 A |
| Option | Function |
|---|---|
| Surge Buster | Lightning surge arrestor |
| Structure / Ref Cell Potential Control | Accurate corrosion protection for structures where overprotection is harmful |
The Surge Buster lightning protection module uses twenty-six 4.5 kA metal oxide varistors (MOVs) to give common-mode and differential surge protection on the CoolPro’s input, output and local cabinet earth; its rated output capability is 50 kA (8/20 µs). It also protects the interrupt control and reference cell connections. It also contains the optically isolated ON/OFF control and a surge protected opto-coupler for buffered/isolated ON/OFF interrupt control if permanently connecting an interrupt sequencer.
The Surge Buster is required only in lightning-prone applications: pipelines or structures longer than 100 metres or higher than 10 metres. There, install the CoolPro with an AERL Surge Buster (50 kA / 500 Joule) to supplement its on-board surge protection; lightning damage to a CoolPro installed in such an application without one is not covered by the warranty. Elsewhere the Surge Buster is optional.
| Surge Buster — electrical characteristics | Value |
|---|---|
| Output current rating (non-repetitive 8/20 µs rating) | 50,000 A |
| Output energy absorption (non-repetitive 8/20 µs rating) | 500 Joules |
| Output energy absorption (non-repetitive 10/1000 µs rating) | 230 Joules |
In some situations, overprotection of a structure may be harmful. Examples of such situations include protection of structures with painted coatings, and structures under mechanical stress (such as tanks and pressure vessels). In these circumstances, precise control of corrosion potential can be achieved using a reference cell placed in the ground near the structure to be protected.
| Parameter | Value |
|---|---|
| Min. controllable structure / ref cell potential | −2400 mV |
| Max. controllable structure / ref cell potential | 2400 mV |
| Parameter | Typical |
|---|---|
| Weight | 1.5 kg |
| Dimensions (L × W × H) | 240 × 160 × 90 mm |
| Input / output cable size | 25 mm² |
| Parameter | Max |
|---|---|
| Max ambient air temp. | 65 °C (12/24 V) · 50 °C (36/48 V) |
| Ibatt — max output current | 30 A |
| VMIN — min input voltage | 11 V |
| VMAX — max input voltage | 60 V |
| Description | Value |
|---|---|
| VOUT — output voltage (adjustable) | 0 – VIN |
| Iq — standby current consumption | 35 mA |
| η — efficiency @ 10 V, 30 A, 25 °C | 97.00% |
| Output current variation with load | < ±0.50% |
| Output current variation with temp. | < ±0.50% |
| Current interruption fall time | 1–2 ms (typ) |
The AERL CoolPro Cathodic Converter™ is a high-current DC–DC converter and controller for impressed current cathodic protection (ICCP). Units can run in parallel to protect large metallic structures. Its high efficiency suits solar-powered sites and keeps component temperatures and thermal cycling low, which extends its life in hot conditions. Its weatherproof enclosure suits the harsh sites where cathodic protection is often deployed.
Options are automatic reference cell (structure potential) control and the AERL “Surge Buster” lightning protection module. Main features:
The CoolPro Cathodic Converter™ can operate at lethal voltages. Take extreme care whenever you work on it.
Battery packs are extremely destructive in reverse polarity and short circuit situations. The CoolPro on-board fuse is provided only as a last line of defence against continual power dissipation in the product. It is always necessary to connect appropriately sized circuit breakers.
All electronic circuits in the CoolPro product or connected to the product are not isolated from the battery. This means that accidentally shorting the control module or the LCD meter module can cause a destructive failure. Use extreme caution when the product is live.
When a structure corrodes, it is because the environment or another metallic body (a cathode) becomes involved in a series of chemical reactions with the structure (the anode). These reactions steal electrons from the metallic bonds holding the structure together, and corrosion is the result.
Impressed current cathodic protection such as supplied by the AERL CoolPro Cathodic Converter™ injects electrical current into the structure, which provides the structure with a surplus of electrons. This means that electrons can still be provided to the environment to fuel the cathodic reactions – but the anodic reaction does not occur, so metallic bonds in the structure are safe from degradation. The protection current is injected using inert metallic anodes and flows through the ground bed to the structure.
Resistance anywhere in the path between the anode and the structure is a cause of wasted corrosion protection power and should be minimised. Multiple anodes are often used to reduce the resistance between the anode and the ground bed. Additionally, mesh anodes with high surface areas can be used, and coke breeze is used as an interface between the anode and the earth.
The corrosion potential of the structure can be thought of as the electrochemical force driving the anodic reactions in the structure to occur. Corrosion potential varies depending on the environmental conditions and the presence of other corrosion-inhibiting factors such as a protective coating. Using impressed current cathodic protection, the aim is to reduce the corrosion potential of the structure so that the anodic reactions are no longer driven to occur.
Determining the correct level of current to provide to the structure is not trivial. Providing too little current can mean that the structure is not completely protected and will corrode. Too much current can lead to other chemical reactions resulting in effects such as hydrogen embrittlement of the structure and breakdown of any protective coatings on the pipe. The corrosion potential of the structure can be determined and accurately corrected for using a reference cell.
A reference half-cell is generally used to survey the corrosion potential in a local area around the structure to be protected. This determines the natural electrochemical corrosion potential which must be cancelled out by impressing current from the CoolPro unit. From here on, this manual assumes a copper/copper sulphate (Cu/CuSO₄) half-cell, the most common type. Impressing current into the structure makes it chemically less anodic; this will be reflected in its potential measured with respect to the Cu/CuSO₄ half-cell. The ideal potential to exist between a Cu/CuSO₄ reference cell and a structure is 850 mV (with the reference cell more positive).
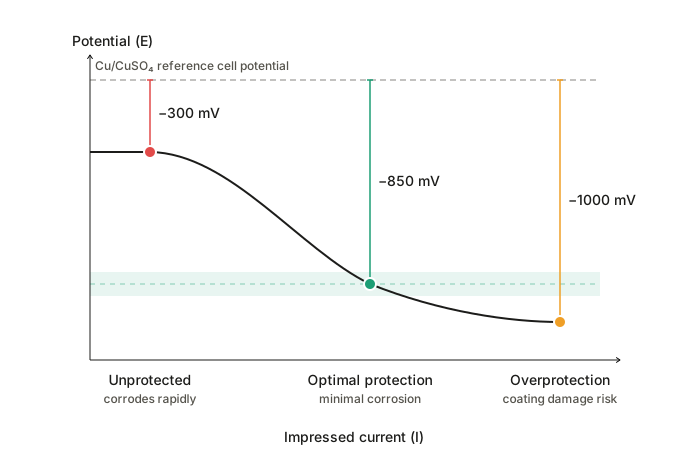
It is desirable to measure the potential of the structure while it is being protected to make sure it is close to the optimal −850 mV level. The problem is that while protection current is flowing there is an ohmic error introduced in the reference cell measurement due to the CP current flowing through the resistance of the ground bed. To reduce the severity of this error, care should be taken to place the reference cell much closer to the structure than the anode injection point.
To compensate for this error even further, the CP current is removed and then instantaneously the potential of the structure is measured. Because the corrosion potential of the structure takes some time to decay back to its natural state, it can be accurately measured a few milliseconds after the ohmic error is removed. This is referred to as measuring the “Instantaneous Off Potential” of the structure.
There are three control modes in the CoolPro unit, although only one can be active at any time. The control modes are output current control mode, output voltage control mode, and structure / ref cell potential control mode.
Output current and output voltage are related by Ohm’s law with the ground bed resistance between the anode and the structure. Ground bed resistance changes with many factors but the major one is ground moisture content. However, at any two given times, if the setup and environment are completely unchanged, a given output voltage will produce the same output current. Struct/ref potential is related to output current by the electrochemical relationships governing how much current is needed to prevent corrosion from occurring.

The control mode which is commanding the lowest CP current will always be active.
Each of the control mode setpoints provides upper limits on the CP current that can be produced. The lowest setpoint will always be the active limit on the CP current.
Using Ref Cell control: Struct/ref potential control mode is tuned to give the desired instantaneous off potential (see chapter 08). Current control mode and voltage control mode are used to set the maximum power that can be delivered by the system in the event of a non-typical operating condition. These should be selected paying attention to the estimated ground bed resistance and being careful not to interfere with the normal operation of Struct/Ref potential control mode.
Not using Ref Cell control: Struct/ref potential control mode is disabled by linking the Struct/ref terminals and turning the adjustment dial clockwise all the way. Current control mode is set to be the desired constant CP current. Voltage control mode setpoint is selected to limit the power delivered by the CP system if the ground bed resistance changes due to local or generalised reductions in ground bed moisture. For example, if regulating in current control mode and the ground bed resistance doubles during a dry period, because P = I²R the power output will double if not checked by the voltage control mode setpoint.
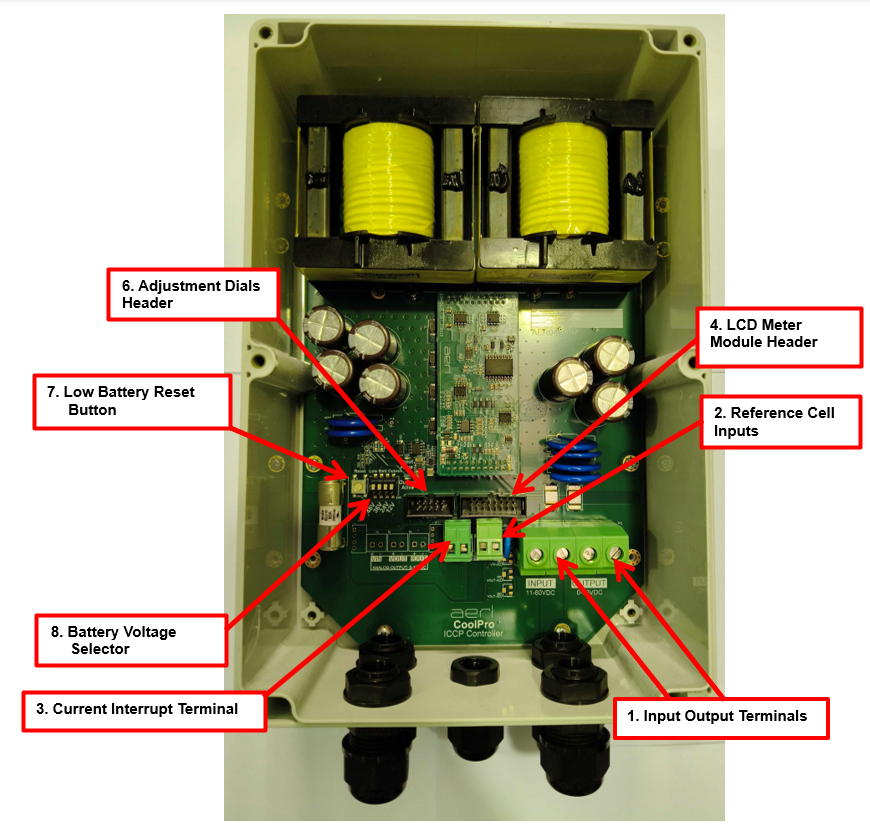
The numbers below match the callouts in Figure 2 (previous page); there is no callout 5.
| Pos. | Description | Function |
|---|---|---|
| 1 | Input / output terminals | Connect battery and load with polarity marked on board. Output + to anode. Output − to structure. |
| 2 | Reference cell inputs | Connect to ref cell and to structure being protected. |
| 3 | Current interrupt terminal | Short terminals together to immediately interrupt current. |
| 4 | LCD meter module header | Ribbon cable connection to front panel LCD meter module. |
| 6 | Adjustment dials header | Ribbon cable connection to front panel adjustment dials. |
| 7 | Low batt reset button | Reset hysteresis on low battery cut out. |
| 8 | Battery voltage selector | Select nominal input voltage for low battery cut out. See arrow for “on” position. |
AERL recommends the use of 6 kVA, 8 kVA or 10 kVA DC-rated circuit breakers with an appropriate voltage rating between the batteries and the CoolPro unit.
Using an output circuit breaker or fuse is not recommended as large currents can be shunted by the onboard surge protection circuitry and the “Surge Buster” during surges. This will cause the output breaker to trip unnecessarily.
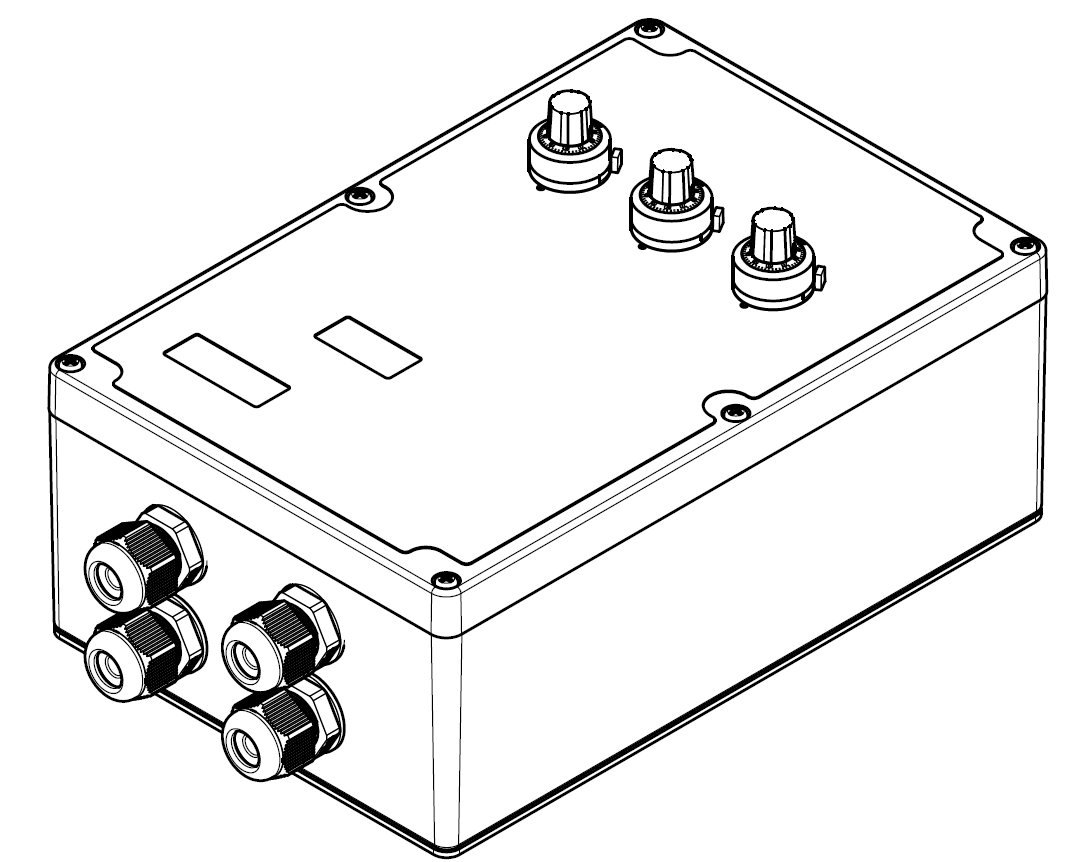
Mount the CoolPro where splashing water and direct sunlight cannot reach it.
The “Surge Buster” is a bare PCB: if you use one, protect it from all moisture and vermin.
Cables should always be routed downwards away from the CoolPro and Surge Buster products so that any moisture which may condense on the cables does not run back into the product.
The aluminium cold plate on the back of the enclosure is the source of heat dissipation for the CoolPro controller. The CoolPro unit will run more efficiently and last longer if the product can be spaced out such that air is allowed to flow past the aluminium plate.
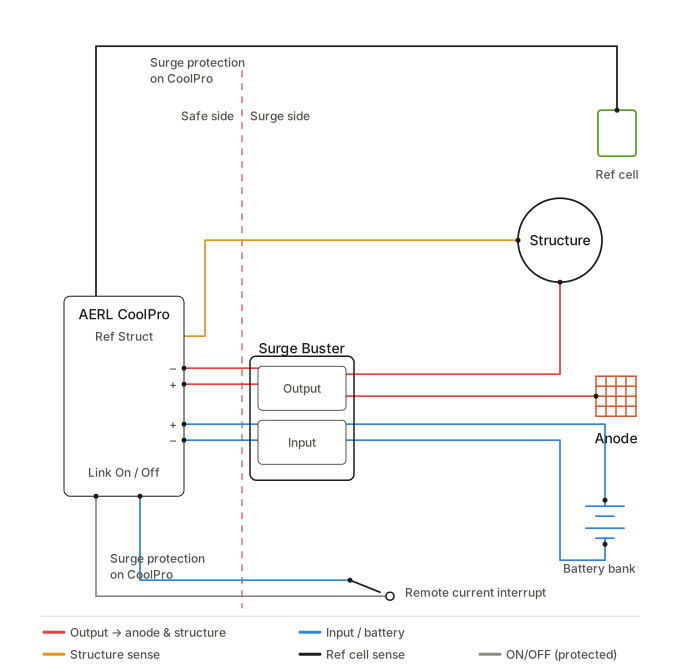
Figure 4 shows the CoolPro connected to the field equipment through a Surge Buster. A dashed line divides the safe side from the surge side. The reference cell and structure sense connect to the Ref Struct terminals; the output feeds the anode and structure, and the input comes from the battery bank. A remote current interrupt switch connects to the Link On/Off (current interrupt) terminals through the Surge Buster’s protected ON/OFF path.
Open the breakers so the CoolPro is isolated from every source before you make any connection.
Connect the battery + and − to the terminals marked Input + and −.
Connect the anodes to Output + and the protected structure to Output −.
Use suitably rated cable for every connection. Check the input polarity with a multimeter before you close any breaker.
Set the battery voltage selector (item 8 in Figure 2) to the nominal battery voltage: 12, 24, 36 or 48 V.
There are three control modes in the CoolPro controller: output current control mode, output voltage control mode, and structure / ref cell potential control mode.
Only one control mode can be active at any time. The control mode with the lowest setpoint will always be active.
Set each setpoint with its dial on the front panel while the CoolPro is running: clockwise raises it, anti-clockwise lowers it.
Shut the CoolPro down in this order to avoid voltage and current transients on the protected structure.
The CoolPro has an automatic low-battery cut-out to protect lead-acid batteries from over-discharge. It stops output when the battery voltage falls below the cut-out voltage, and resumes when the battery has recharged to the cut-in voltage.
To force the CoolPro to cut back in at any voltage above the cut-out voltage, press the Low Batt Reset button (item 7 in Figure 2).
| Nominal battery voltage (V) | Cut-out | Cut-in |
|---|---|---|
| 12 | 11 V | 13 V |
| 24 | 22 V | 26 V |
| 36 | 33 V | 39 V |
| 48 | 44 V | 52 V |
To measure the instantaneous off potential, the output can be switched to zero within 1–2 ms. Link the current interrupt terminals (item 3 in Figure 2; Link On/Off in Figure 4): linked, the output is off.
With the reference cell option fitted, calibrate the CoolPro for the required structure / ref cell potential: turn the “Ref Cell” dial while you measure the structure / ref cell voltage with a multimeter (or with high-speed current interruption and an oscilloscope) until it reaches the required value.
The reference cell can be controlled over a range of +2400 mV to −2400 mV.
The CoolPro is usually run in constant current output mode. Set the output current with the “Current” dial on the front panel.
When the ground bed resistance rises in dry periods, the voltage limit overrides the current control mode. This limits the power drawn from the batteries and protects them from heavy cycling. Set the voltage limit with the “Voltage” dial on the front panel.
The Meter Board is a microcontroller-driven sub-PCB mounted alongside the CoolPro power stage. It provides:
The Meter Board is a monitoring path only. RS485 / Modbus traffic does not change output current, voltage limit, or reference-cell setpoint. Those remain manual front-panel adjustments per chapter 07.
The unit is calibrated and tested at the AERL factory. Re-calibration is a workshop operation; contact AERL if a unit’s measurements drift.
During normal operation, the LCD alternates between input and output measurements every 5 seconds. Each screen shows the corresponding voltage, current, and the board temperature.
Default communication parameters: 9600 baud, 8-N-1, station 40.
To use a different station address or baud rate, change it in the field over Modbus: write the new address to holding register 40001 (or the baud rate index to 40002); the change takes effect after a reset (see the CoolPro Modbus RTU Communications Protocol). Alternatively, ask AERL to pre-program a different address or baud rate when ordering. The settings are kept in non-volatile memory and survive power cycles.
The Meter Board exposes RS485 on a standard 8P8C RJ45 connector.
| Pin | Signal |
|---|---|
| 1 | NC |
| 2 | NC |
| 3 | RS485 A |
| 4 | NC |
| Pin | Signal |
|---|---|
| 5 | NC |
| 6 | RS485 B |
| 7 | NC |
| 8 | GND |
Pins 1, 2, 4, 5, and 7 are not connected. Use only pins 3 (A), 6 (B), and 8 (GND).
The register map (live measurements, status flags, device information and configuration registers) is in the CoolPro Modbus RTU Communications Protocol (CP-MODBUS-RTU), available from aerl.com.au.
Australian Energy Research Laboratories
1/75 Bluestone Circuit
Seventeen Mile Rocks QLD 4073
Australia
| Date | Version | Description |
|---|---|---|
| Earlier revisions: see previous editions. | ||
| 11/05/2026 | AER04 Rev 2.0.0 | First issue for the CP30, under document number AER04 |
| 08/11/2026 | AER04 Rev 2.0.1 | Re-issued in the new AERL document design; the Surge Buster is required only in lightning-prone applications; the Modbus address and baud rate can be changed in the field; ambient temperature for 36/48 V inputs is −20 to 50 °C |
Australian Energy Research Laboratories
1/75 Bluestone Circuit
Seventeen Mile Rocks QLD 4073
Australia