 Download PDF· Rev 1.1.1
Installation and Operation User Manual
Nexus HMI
10.1″ Sunlight-Readable Touch HMI
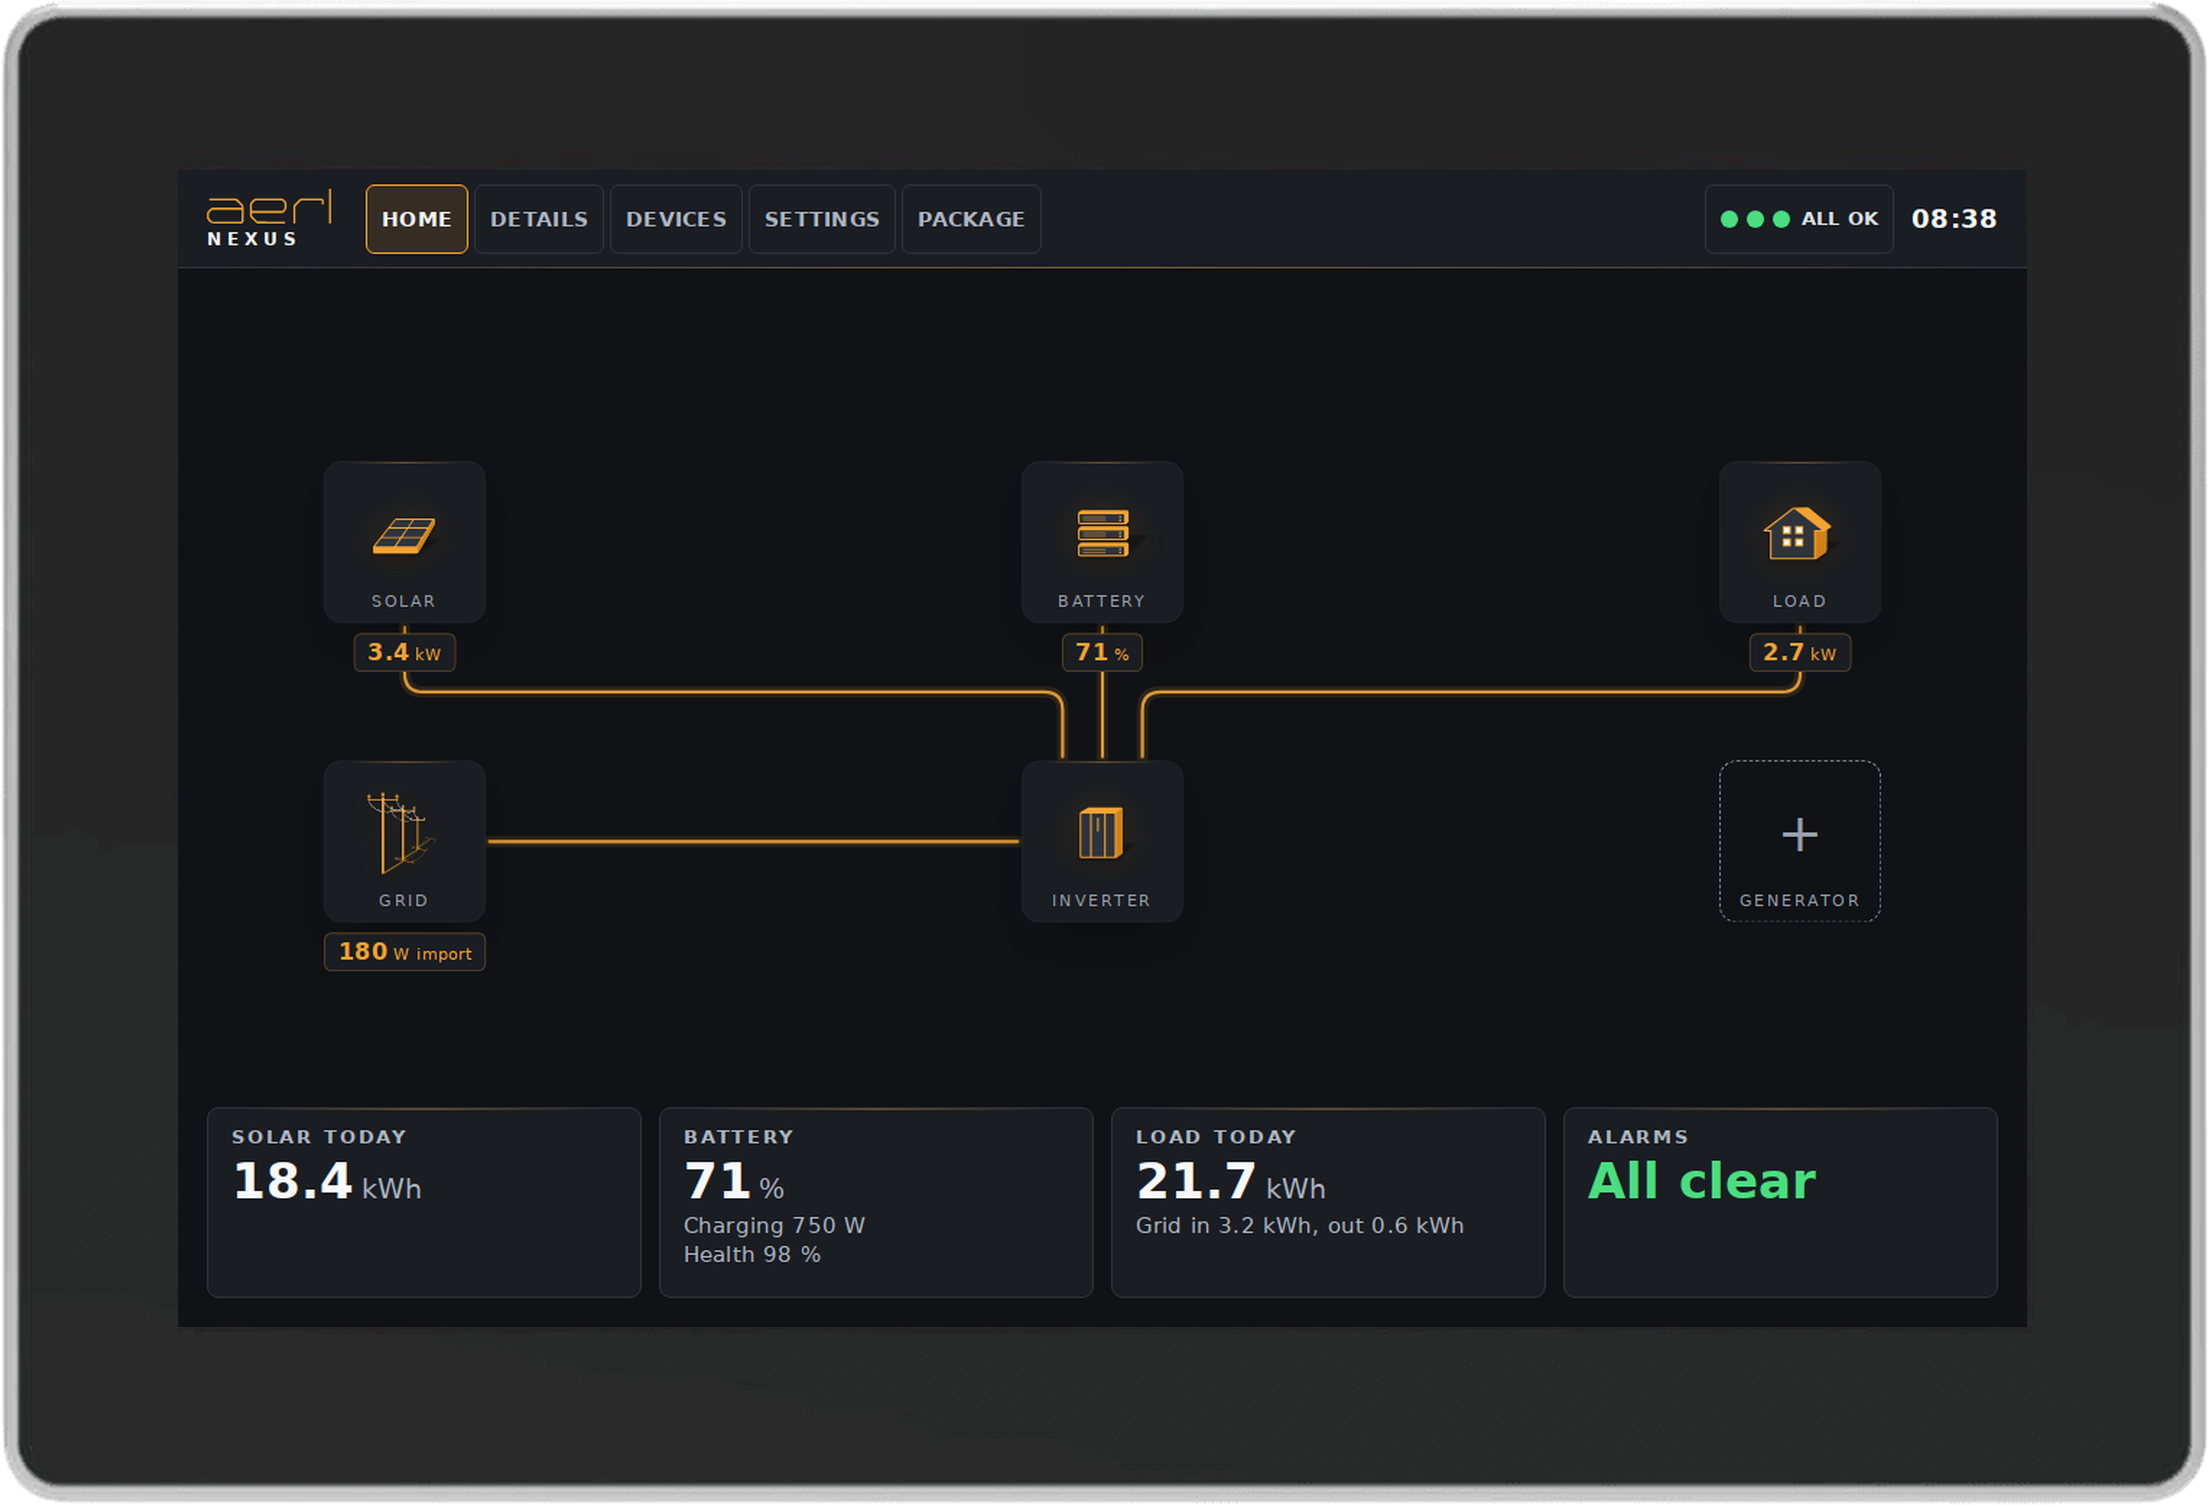
HMI-10 · NEXUS-HMI-10
Installation and Operation User ManualRev 1.1.1, 11 Nov 2026
Download PDF· Rev 1.1.1
Installation and Operation User Manual
10.1″ Sunlight-Readable Touch HMI
Australian Energy Research Laboratories (AERL) was founded in 1985 by Stuart Watkinson to commercialise the Power Optimizer, which he developed while studying at the University of Queensland. It became the AERL MAXIMIZER™, a universal maximum power point tracker (MPPT).
Today AERL designs, integrates and supports power conversion, lithium energy storage, monitoring and earth-fault detection products for commercial, industrial and off-grid energy systems, including oil and gas, mining and telecommunications sites.
AERL and the AERL logo are trademarks owned by AERL Holdings Pty Ltd and used by AERL Pty Ltd under licence. These trademarks may be registered in Australia and other countries. Solinteg, Deep Sea Electronics and other third-party names are trademarks of their respective owners; they are used here only to identify compatible equipment.
November 2026 (11/2026)
AERL Nexus HMI (HMI-10) User Manual © 2026 AERL Pty Ltd. All rights reserved.
UNLESS SPECIFICALLY AGREED TO IN WRITING, AERL PTY LTD:
(a) MAKES NO WARRANTY AS TO THE ACCURACY, SUFFICIENCY OR SUITABILITY OF ANY TECHNICAL OR OTHER INFORMATION PROVIDED IN ITS MANUALS OR OTHER DOCUMENTATION.
(b) ASSUMES NO RESPONSIBILITY OR LIABILITY FOR LOSS OR DAMAGE, WHETHER DIRECT, INDIRECT, CONSEQUENTIAL, OR INCIDENTAL, WHICH MIGHT ARISE OUT OF THE USE OF SUCH INFORMATION.
THE USE OF ANY SUCH INFORMATION WILL BE ENTIRELY AT THE USER'S RISK.
Australian Energy Research Laboratories, 1/75 Bluestone Circuit, Seventeen Mile Rocks QLD 4073, Australia
aerl.com.au · [email protected] · [email protected] · 1800 950 865
This manual contains important safety information and installation and operating instructions for the AERL Nexus HMI (HMI-10). It uses the following symbols for important operating information and potentially dangerous conditions.

Indicates information that must be followed to ensure proper installation or operation of the Nexus HMI.

Indicates a critical procedure for the safe installation or operation of the Nexus HMI or the equipment it controls.
This manual covers installing the Nexus HMI, connecting it to the site's inverter, battery and generator controller, and using its screens. Read all of its instructions and cautions before you start.
Only qualified electricians and technicians may install and commission the Nexus HMI. Site operators may use the Home and Details screens; the Devices, Settings, Package and Generator screens are protected by the installer PIN.
Do not disassemble or attempt to repair the Nexus HMI unless you are a qualified technician and have authority in writing from AERL to do so.
AERL will not be held responsible in any way for the mishandling of this product or for installation of the product in a manner that does not follow the instructions in this manual or as advised by AERL.
The AERL Nexus HMI (HMI-10) is a 10.1″ sunlight-readable touch panel with the AERL Nexus software built in. Its Home screen shows the site's energy flows at a glance. Its other screens give the installer a detailed view of each device, and give authorised staff local control of the inverter and, where one is added, the generator.
The Nexus HMI reads the inverter and the battery over the site's Ethernet network, and a generator controller over Ethernet or RS-485. When it has an internet connection, it sends the site's readings to AERL Cloud. It can also serve the site's data to a SCADA system over Modbus TCP; this is off until it is switched on.
| Equipment | How the Nexus HMI connects |
|---|---|
| Solinteg M2HT hybrid inverter (as in the AERL All-In-One) | Modbus TCP over Ethernet, through the inverter's data logger (port 502, unit ID 255), with RS-485 as an optional fallback link |
| Solinteg battery of the All-In-One | Modbus TCP over Ethernet, through its own data logger |
| Deep Sea Electronics DSE 7410 MkII generator controller (optional add-on) | Modbus TCP over Ethernet (unit ID 10), or Modbus RTU over RS-485 |
| Site SCADA (optional) | Modbus TCP server on the Nexus HMI, off by default |
| Other devices | Contact AERL for a custom integration |
The Nexus HMI takes one inverter, one battery and one generator controller.
| Screen | Access | What it is for |
|---|---|---|
| Home | Open | The site's energy flows, today's totals and alarms |
| Details | Open | Each device in detail, the network and cloud connection, and the event log |
| Devices | PIN | Finding and adding the inverter, battery and generator, and each device's settings |
| Settings | PIN | Network ports, SCADA server, package control, PIN, cloud and software |
| Package | PIN | Inverter package Start, Stop, Emergency stop, Clear emergency stop |
| Generator | PIN | Generator control and quiet hours; shown once a generator is added |
| Parameter | Value |
|---|---|
| Diagonal size | 10.1 in |
| Resolution | 1280 × 800 (WXGA) |
| Panel type | IPS · normally black, transmissive |
| Luminance | 1000 cd/m² |
| Viewing direction | All |
| Touch panel | Capacitive · up to 10 touch points |
| Backlight | White LED · 30 000 h min. life |
| Parameter | Value |
|---|---|
| Input voltage | 12–24 Vdc (24 Vdc supplies need an in-line 12 V regulator; contact AERL) |
| Power consumption | 9.6 W typ. (static desktop, default brightness) |
| Parameter | Value |
|---|---|
| Processor | Quad-core Cortex-A55, 2.0 GHz · Mali-G52 GPU |
| Memory | 2 GB LPDDR4 |
| Storage | 32 GB eMMC · TF card slot |
| Operating system | Linux |
| Ethernet | 2 × 10/100/1000 |
| RS485 · CAN · RS232 | 2 × each (expansion IO header) |
| Wireless | Wi-Fi · Bluetooth · 4G LTE (nano SIM) |
| USB | 2 × USB-A · 1 × USB-C (OTG) |
| Video out | HDMI 1.4 |
| Parameter | Value |
|---|---|
| Dimensions (W × H × D) | 260.4 × 177.4 × 37 mm |
| Weight | 1.21 kg typ. |
| Enclosure | Full metal |
| Ingress protection | IP65 (front) |
| Operating temperature | −20 to 70 °C |
| Storage temperature | −30 to 80 °C |
| Mounting | Panel mount, or rear mount · 4 × M4 threaded holes, VESA 75 × 75 mm |
| Certifications | RoHS |
| Part number | NEXUS-HMI-10 (model HMI-10) |
| Warranty | 2 years |
All installations must comply with national and local electrical standards and codes of practice.
The Nexus HMI mounts one of two ways:
For a rear mount, seal the window in the door so that the front of the Nexus HMI stays dry. Contact AERL for the panel cut-out dimensions.
Check the polarity and the voltage at the Nexus HMI's input before you connect it. Applying more than the rated input voltage, or reversed polarity, may damage the unit and is not covered by the warranty.
The Nexus HMI has two Ethernet ports, LAN 1 and LAN 2. As delivered, both take their address from the site network (DHCP), so nothing needs to be set on the Nexus HMI for it to join the network.
On a typical site the router connects to a network switch, and the inverter, the battery and the Nexus HMI all plug into that switch:
If the site router can reserve addresses, reserve the inverter's and the battery's, so that their addresses do not change.
Where there is no router, the Nexus HMI can run the network itself:
When power is applied, the Nexus HMI starts its software and then shows Home. Start-up can take up to about two minutes. The Nexus HMI does not need an internet connection to start or to show the site's equipment.
On a new unit no devices are set up yet, and Home says "No devices set up yet." Touch Set up devices, enter the PIN, and find and add the inverter and battery (see Setting Up the Inverter and Battery in the Devices chapter).
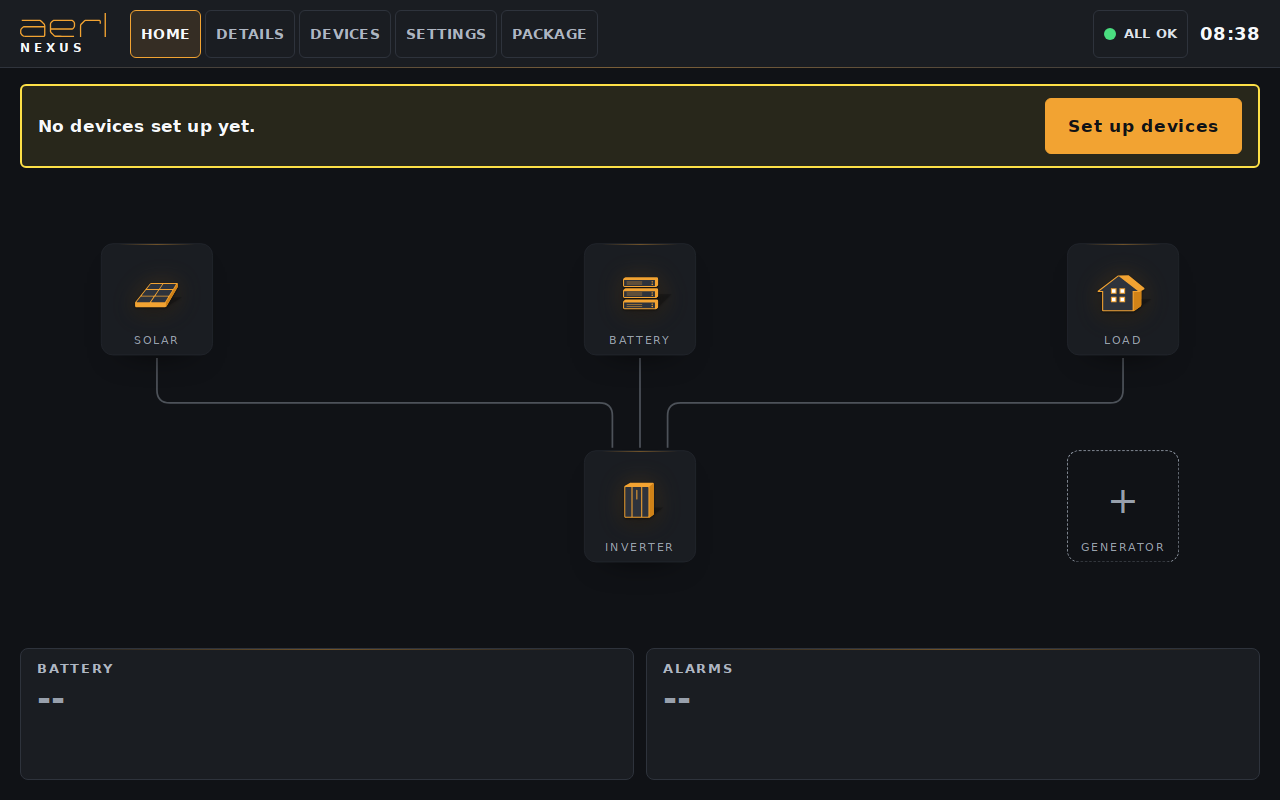
Every screen has the same header:
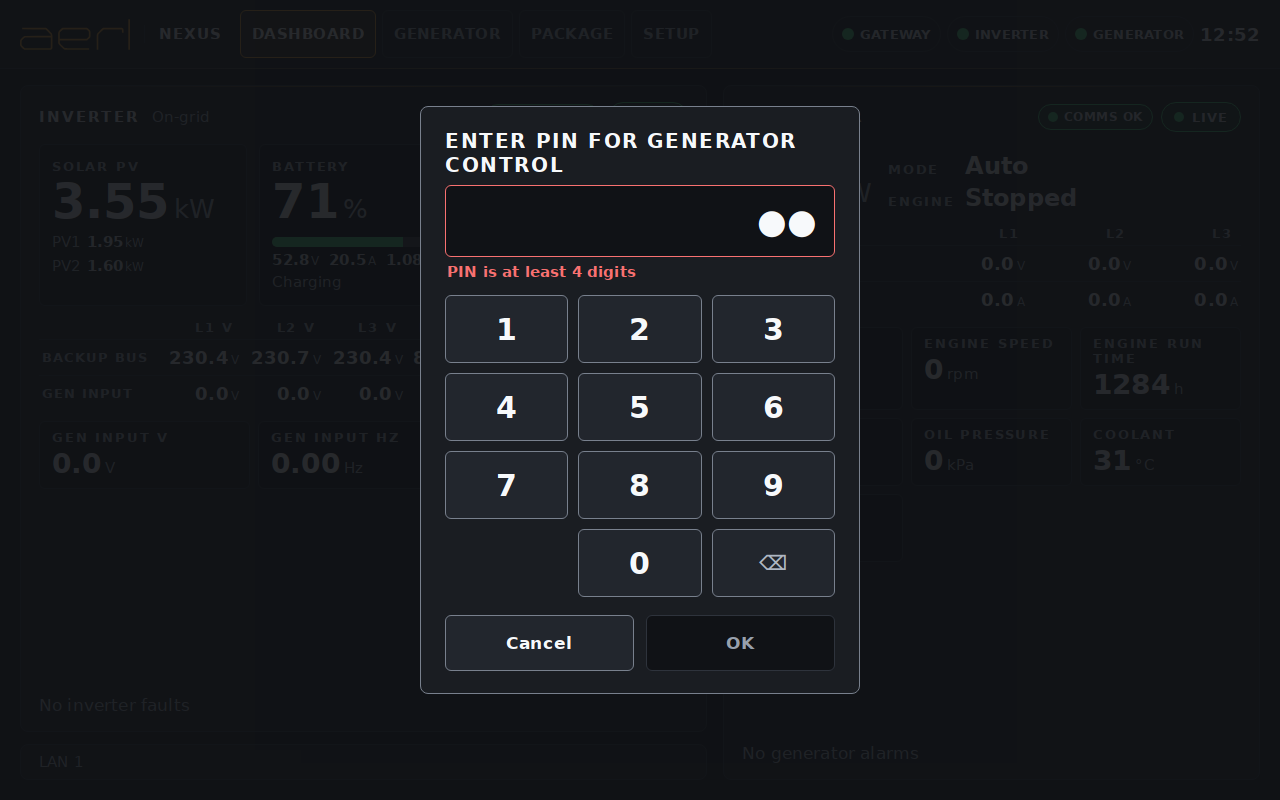
The Nexus HMI is used by touch only; there is no keyboard or mouse. Numbers, addresses and PINs are entered on an on-screen numeric keypad. Touch a field to open the keypad, enter the value and touch OK, or Cancel to leave the value as it was.
Home and Details are open to everyone. Devices, Settings, Package and Generator ask for the installer PIN ("Enter PIN for Devices", "Enter PIN for Settings", "Enter PIN for Package control", "Enter PIN for Generator control").
Home shows the site's energy flows, drawn as in AERL Cloud. It needs no PIN.
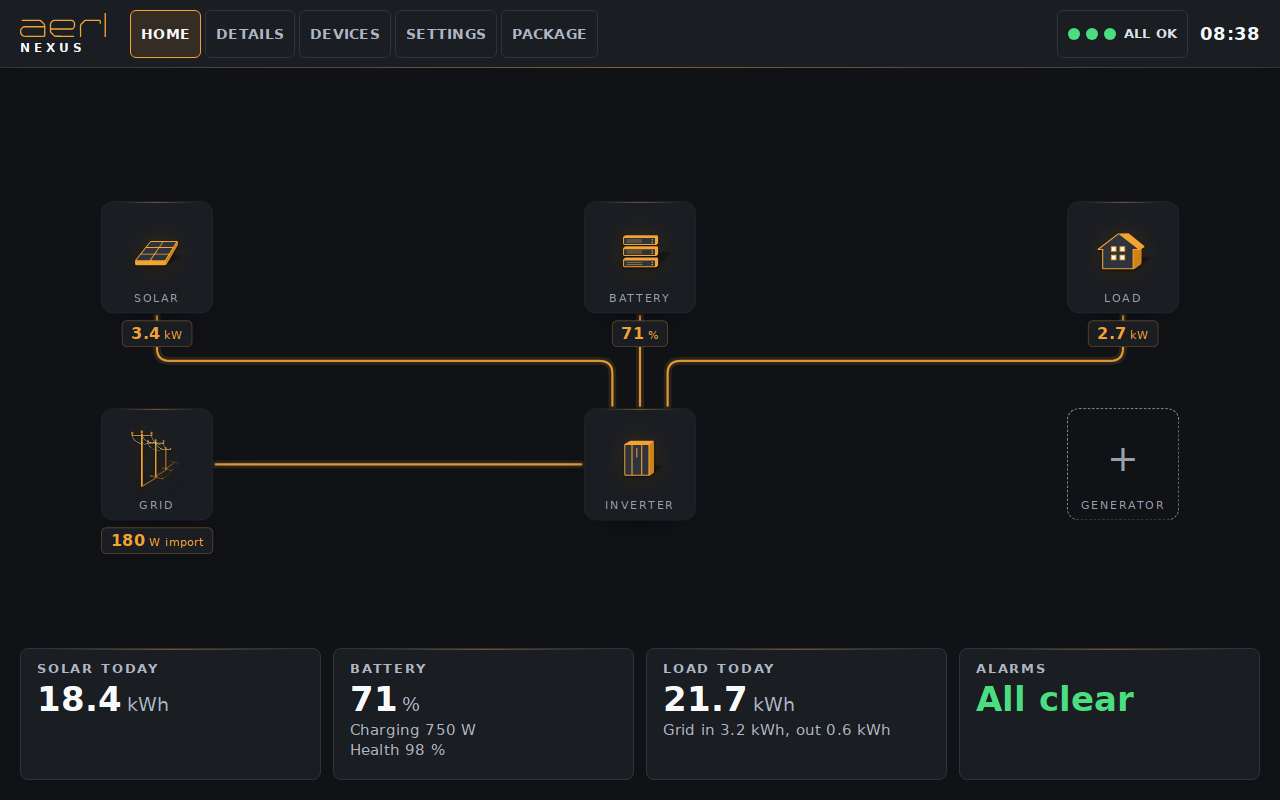
The battery's values come from the battery itself while it answers. If it stops answering, or no battery is set up, the Battery tile and card use the inverter's own battery values (state of charge, power, voltage and current) instead, and keep showing live values. When a battery that is set up stops answering, the Battery tile carries a warning ("BMS no reply · from inverter") and the Battery card says "From the inverter: the BMS is not answering". Values only the battery itself has (cells, BMS limits and battery alarms) show as unavailable in Details until it answers again.
Details is for the installer. It is open to everyone and changes nothing. The menu on the left opens Inverter, Battery, Generator (once a generator is added), Network & cloud and Event log.
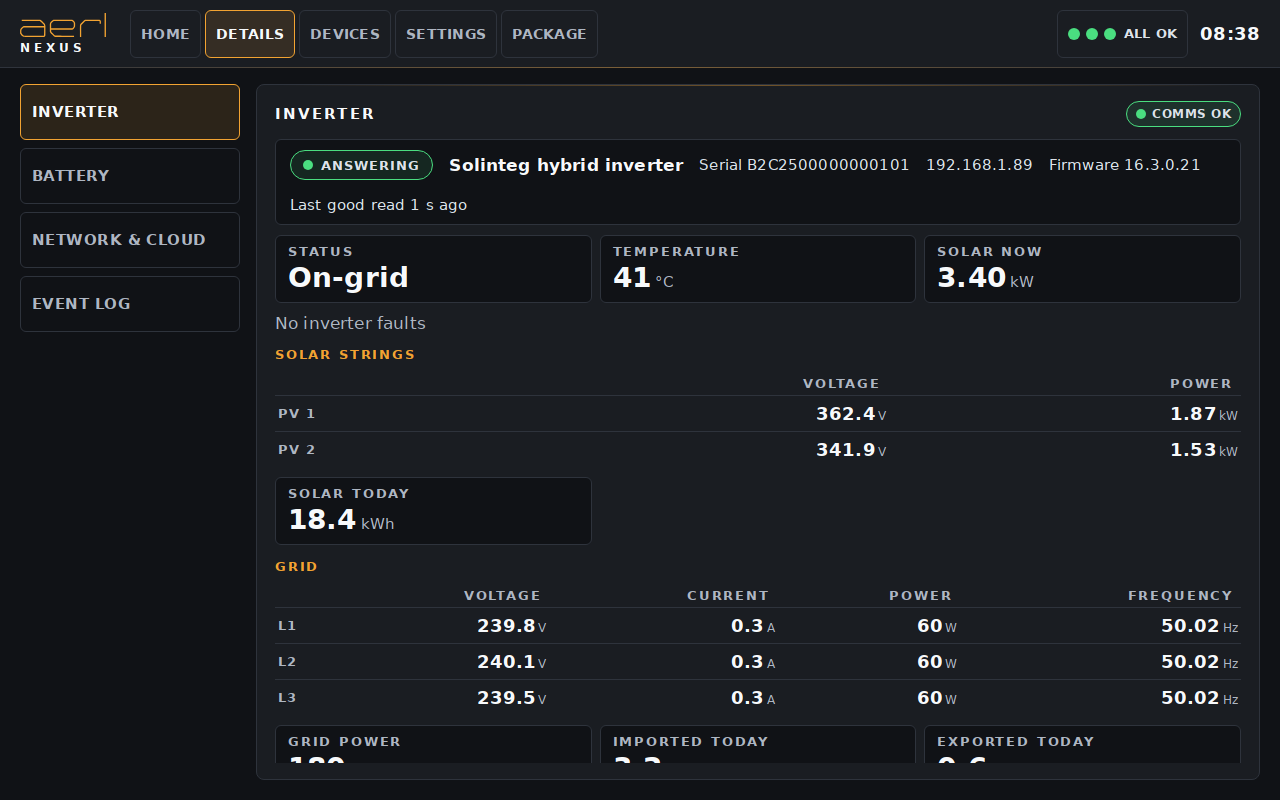
Each device page opens with what the Nexus HMI is talking to: the device's state, model, serial number, address and firmware, and the time since its last good reading. A value with no current reading is shown greyed as "--".
Alarms and faults are listed with the number active, the most serious first: a solid red bar for a fault, shutdown or electrical trip, a yellow outline for a warning.
The event log is the Nexus HMI's own record of what happened, newest first: devices added, removed, lost and answering again; address changes; a different device answering at a device's address; alarms raised and cleared; the gateway stopping and answering again; SCADA clients connecting; changes to settings, the network and the PIN; and package and generator commands. For example: "Battery: no reply (last seen at 192.168.1.58)", "Battery: address set to 192.168.1.61 (was 192.168.1.58)".
Touch Refresh to load new entries, and Show older events for more; up to the newest 500 are shown.
The Nexus HMI keeps a record of the site's readings on its own storage, for AERL support: every reading for the last 7 days, one-minute summaries for up to a year, and daily totals, in at most about 3 GB (when it is full, the oldest one-minute summaries go first). The event log is kept for up to five years. The Nexus HMI has no history screens; the site's history is in AERL Cloud.
If the internet connection is lost, the Nexus HMI keeps the readings and sends them to AERL Cloud when the connection is back. Settings > Cloud & software shows how many are waiting.
Devices is where the installer sets up what the Nexus HMI reads: the inverter, the battery and, as an add-on, the generator. It needs the PIN.
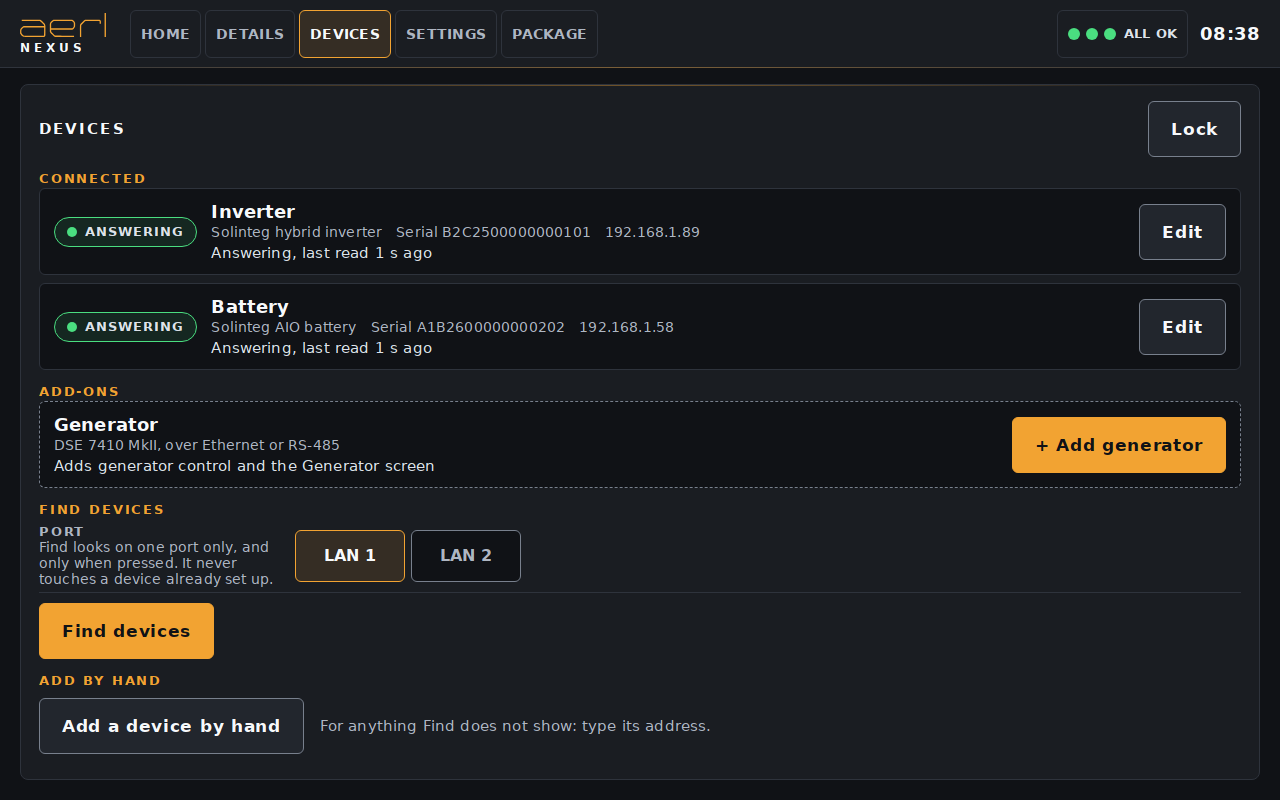
The screen has four parts:
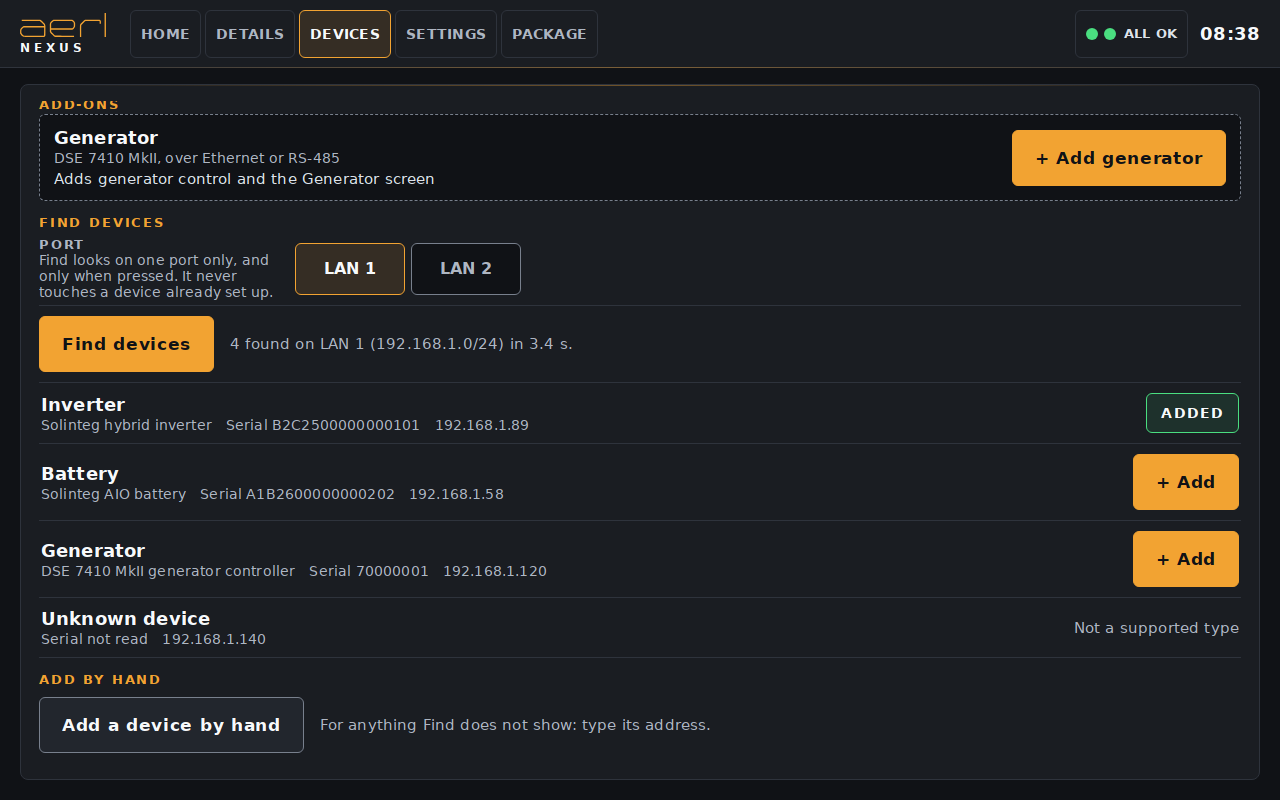
Find looks only on the port you choose, and only when you touch Find devices: the Nexus HMI never searches the network by itself, and Find never touches a device that is already set up. On a network of more than 254 addresses, only the 254 around the Nexus HMI are checked.
Each result has one action:
| Result | Meaning |
|---|---|
| + Add | A supported device that is not set up yet. |
| Added | Already set up at this address. |
| Update IP | A device that is set up, found at a new address (see When a Device's Address Changes). |
| Not a supported type | A device the Nexus HMI does not read. |
| In use by another device | It answers, but another client holds its connection, so it cannot be checked or added. |
| Not checked, Does not match | It answers with the ID of a device set up here, but its serial number could not be checked, or is a different one. Nothing is offered: check the device. |
For a device that Find does not show, touch Add a device by hand. Choose its Type (Inverter, Battery or Generator) and enter its IP address, Port (usually 502) and Unit ID (0 to 255; the Solinteg default is 255), then touch Save. Nothing is sent until Save.
The Nexus HMI reads each device's serial number the first time it answers, and remembers it with the address. From then on it uses a device's readings only while the device at that address answers with that serial number. If another device answers there (for example after two devices swap addresses when the router restarts), the device's row says "Different device at this address", and that device's readings are not used. Run Find devices to put it right.
When a device stops answering, its row turns red with the reason and the address it was last seen at, and offers Find again.
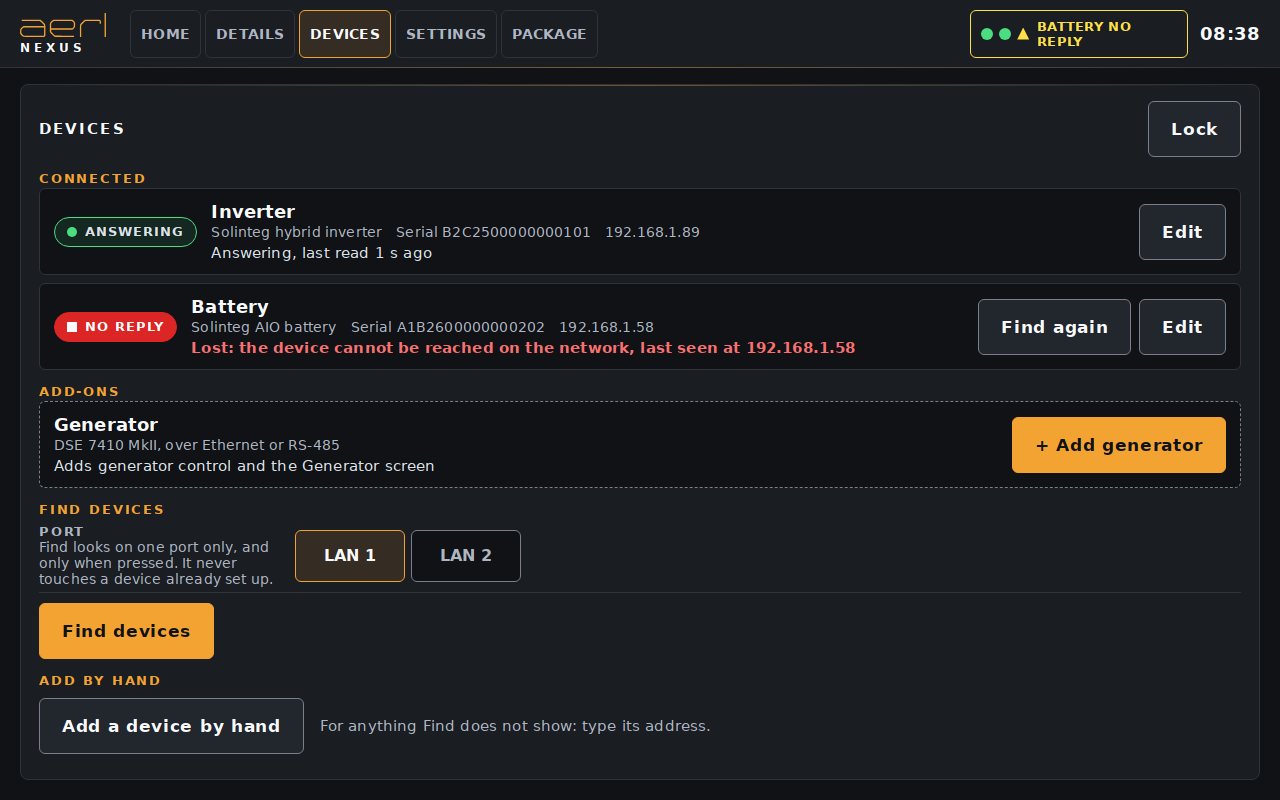
The reason says where to look:
To move a device to its new address:
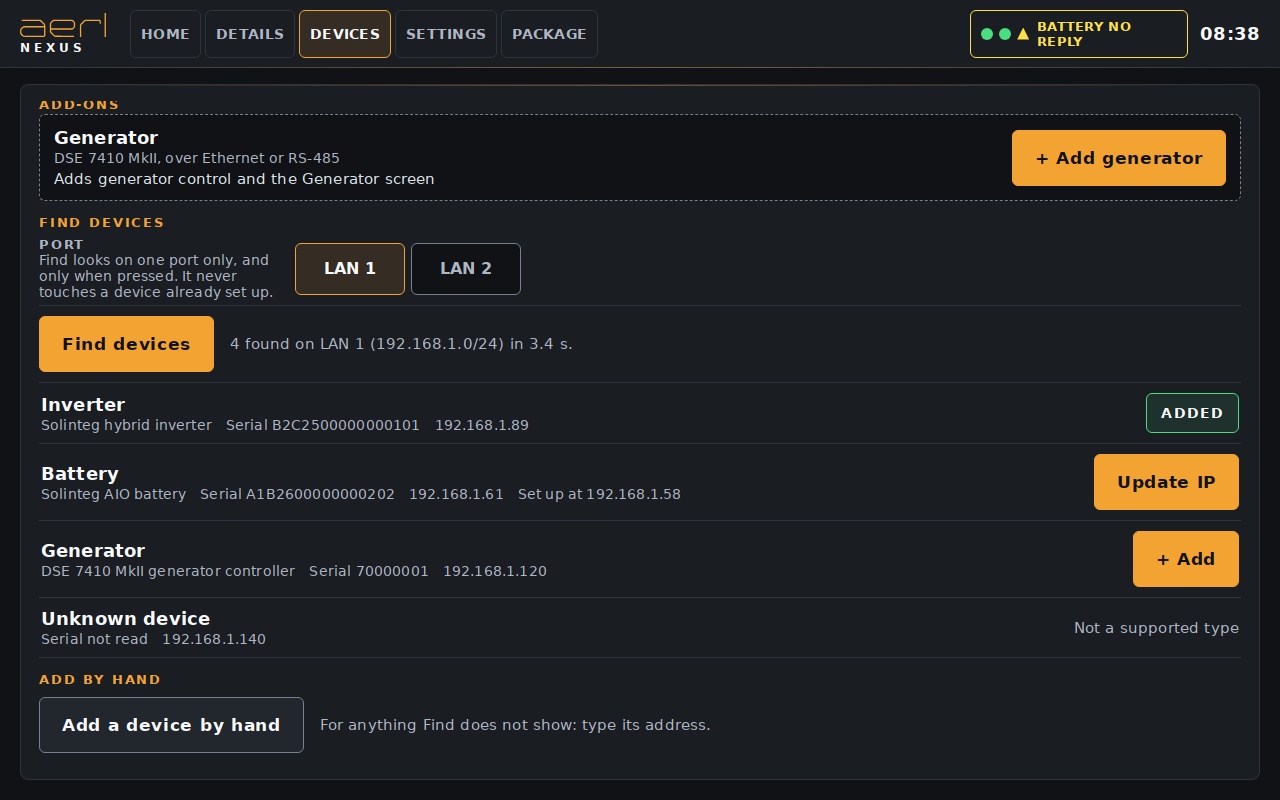
If two devices have swapped addresses and Find saw both move, Update IP on one moves both.
Each device's page in Devices (Edit) has the setting Follow this device if its address changes. It is Off by default, and AERL recommends leaving it off. The row reads: "Off (more secure): if its address changes, use Find devices and Update IP. On: the panel moves to a new address only after the device there answers with serial …". It works only for a device on Ethernet that was added with Find devices, and only once the device has answered with its serial number.
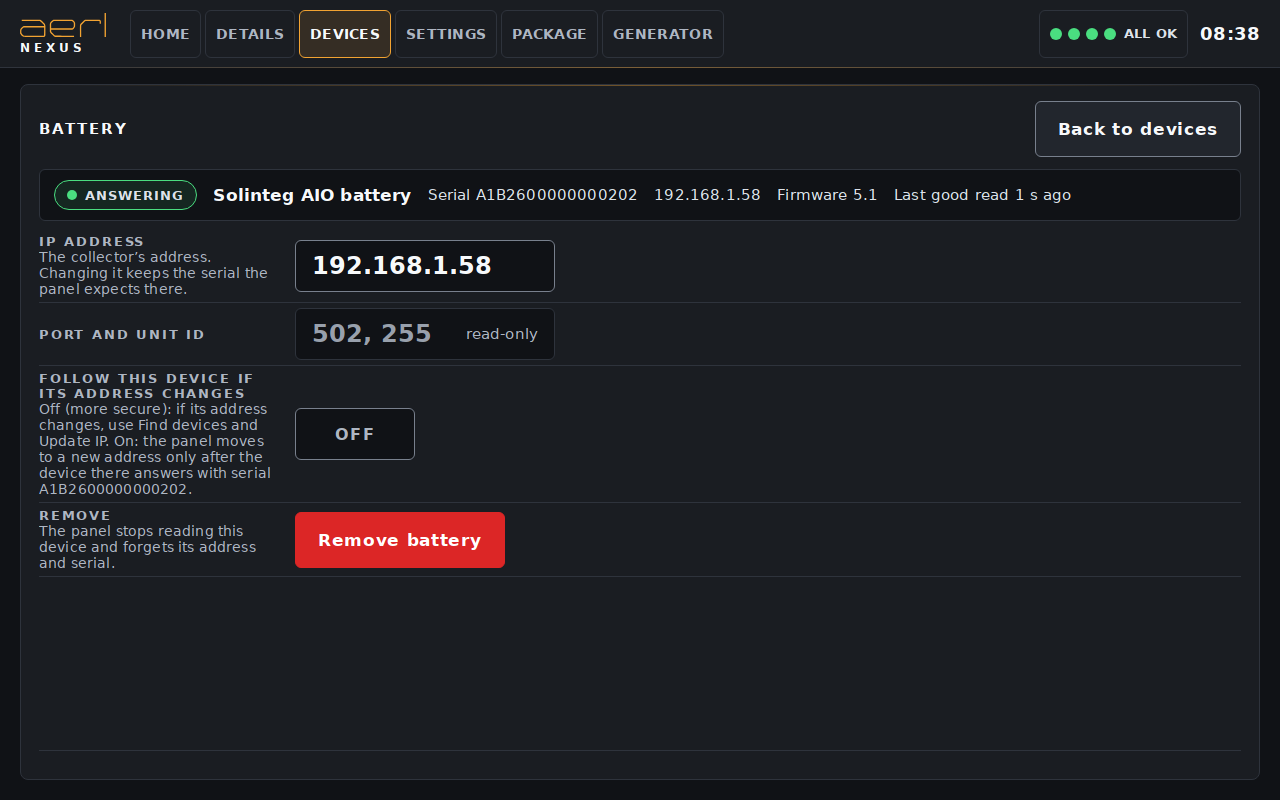
When the setting is on and the device stops answering, the Nexus HMI looks for it on its network and moves to the new address, but only after the device at the new address answers with the remembered serial number. Each move is written to the event log.
Turning it on asks first, in a dialog titled "Follow this device?" with a red Turn on anyway button:
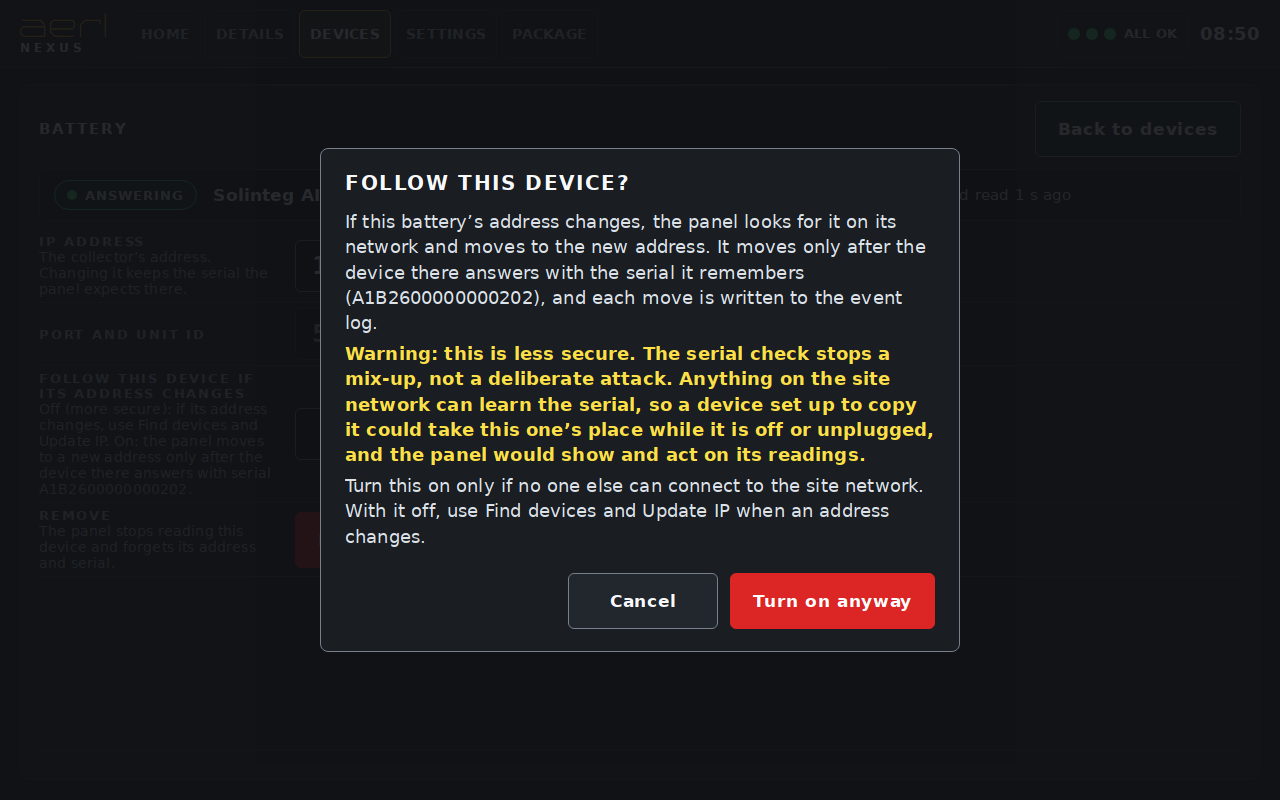
Following a device is less secure. The serial number check stops a mix-up, not a deliberate attack: anything on the site network can learn a device's serial number, so a device set up to copy it could take the real device's place while that one is off or unplugged, and the Nexus HMI would then show and act on its readings. Turn it on only if no one else can connect to the site network. With it off, use Find devices and Update IP when an address changes.
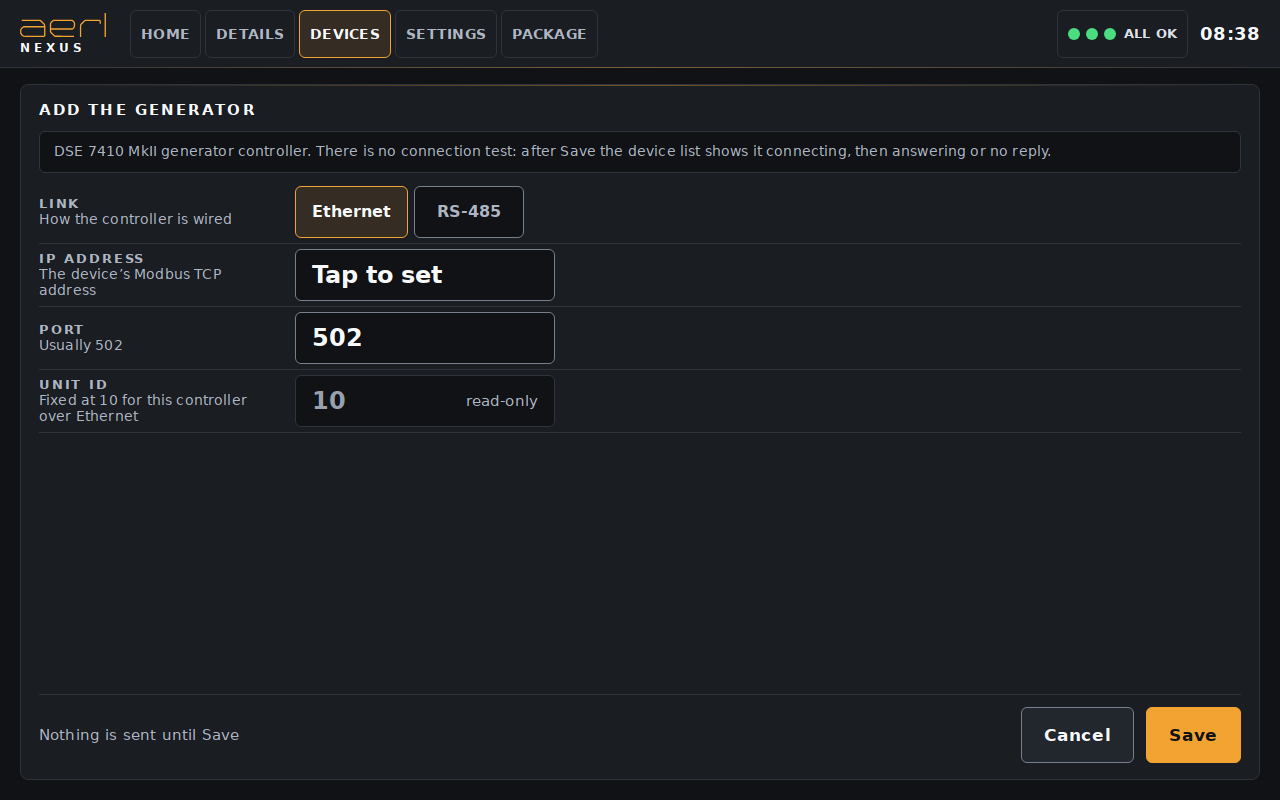
Once the generator is added, the Generator screen appears in the header, the Generator tile on Home shows its output, and Details has a Generator page. To set up generator control, touch Edit on the generator's row and set Panel control and, if the controller asks for one, the Generator controller PIN (see Device Settings). Quiet hours are set on the Generator screen.
Touch Edit on a device's row to open its page. It opens with the same line as Details (state, model, serial number, address, firmware, last good reading).
The inverter's and the generator's pages show the connection's state and hold its settings. Changes form a draft: touch Apply… to see the list of changes and confirm them, or Revert to discard them. Back to devices asks first if a change has not been applied.
| Setting | Use |
|---|---|
| Polling | Read this device (On or Off). |
| Link | Ethernet, or RS-485 where the device offers it. |
| IP address, Port | The device's Modbus TCP address. The port is usually 502. |
| Unit ID | Inverter: 0 to 255 (the default is 255; some units use 247). Generator: fixed at 10 over Ethernet; set at the controller on RS-485 (1 to 247). |
| Setting | Use |
|---|---|
| Poll interval | Seconds between reads (2 to 300). |
| RS-485 fallback | On an Ethernet link: switch to RS-485 if Ethernet stops answering, and back when it recovers. Set the channel, the baud rate, the RS-485 unit ID (the inverter's: Settings, General Set, Modbus Addr on the inverter), how long Ethernet must fail before it switches (Switch after), how often Ethernet is tried while on RS-485 (Probe every) and how long Ethernet must keep answering before it switches back (Return after). |
The RS-485 fallback is not tested in normal running: only one link is used at a time, so a dead RS-485 cable is not noticed until Ethernet fails. Commission it by pulling the Ethernet cable once.
The generator's page also has:
On the battery's page only the IP address can be changed; the port and unit ID are fixed. Its readings are used only if the data logger at the new address answers with the remembered serial number.
Every device's page also has Remove (for example Remove battery): the Nexus HMI stops reading the device and forgets its address and serial number. Removing the generator also ends generator control from the Nexus HMI. A removed device can be added again.
Settings holds the Nexus HMI's own settings. It needs the PIN. The menu on the left opens Network, SCADA, Package control, Security and Cloud & software; Lock locks Settings straight away.
Changes to SCADA and package control form a draft ("1 unsaved change"). Touch Apply… to see the list of changes and confirm them, or Revert to discard them. The screen then shows "Settings applied", or "Not applied" if the change was not kept. Network changes go on trial instead (below).
For each port, LAN 1 or LAN 2, the page shows what the port has now (cable, address, netmask, gateway, DNS and its service address), and where it gets its address (Address from):
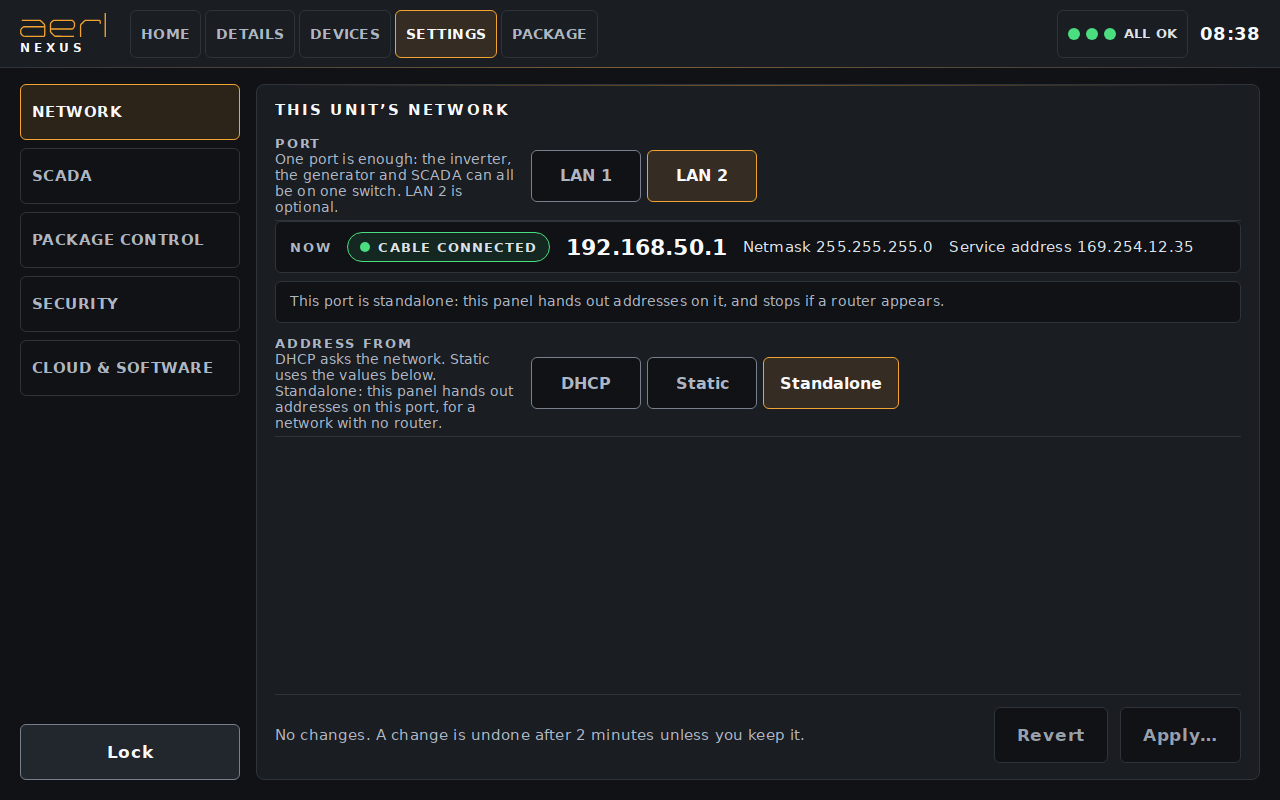
A network change is on trial: after you apply it, the Nexus HMI checks the new setting and undoes it by itself after 2 minutes unless you touch Keep. Touch Undo to go back straight away. While a change is on trial, a banner on every screen offers Review. If the new gateway does not answer, the trial says so and Undo is the highlighted button. This keeps a wrong setting from cutting the Nexus HMI off its network; the Nexus HMI's own screen always works, whatever the network settings.
With Standalone, the Nexus HMI takes the address 192.168.50.1 on the port and gives the devices plugged into it addresses from 192.168.50.10 to 192.168.50.99. It offers them no gateway and no DNS server.
Use Standalone only on a network of its own. Do not plug a standalone port into a network that has a router: the Nexus HMI stops as soon as it sees the router, but a device could be given a wrong address in the meantime.
The SCADA Modbus TCP server is off by default: nothing listens on port 502. Turn SCADA server on to let SCADA systems read the site over Modbus TCP. Its settings then appear:
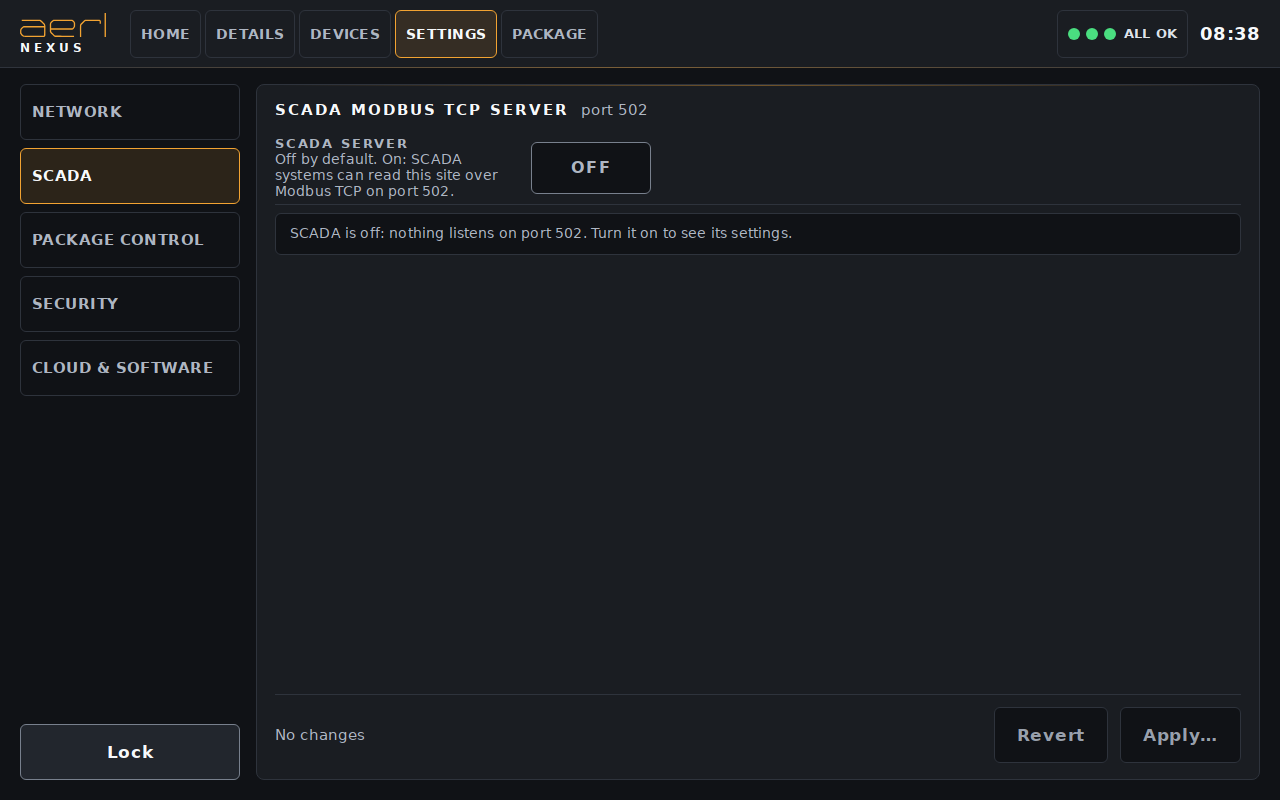
Contact AERL for the SCADA register map.
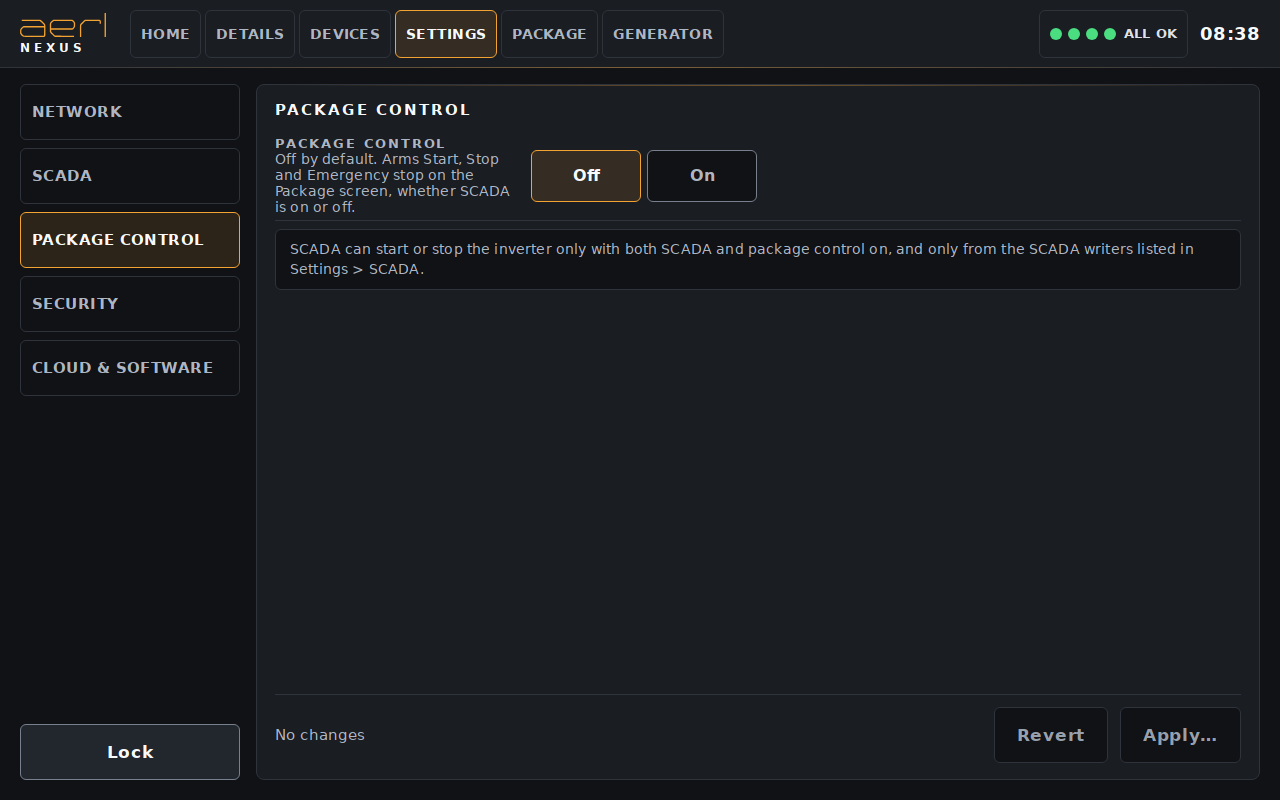
Package control is off by default. Turning it on arms Start, Stop and Emergency stop on the Package screen, whether SCADA is on or off. SCADA can start or stop the inverter only with both SCADA and package control on, and only from the SCADA writers listed in Settings > SCADA.
Change the installer PIN here: touch Change PIN, enter the current PIN, then the new PIN twice (4 to 8 digits). Until the default PIN is changed, the page shows "The default PIN is still in use. Change it now."
This page shows the cloud Connection (Online, Offline or Not known), the Last upload, the readings Waiting to upload, and the Panel software version. Quote the version when you contact AERL.
The Package screen starts and stops the inverter package. It needs the PIN, and package control must be switched on in Settings > Package control.
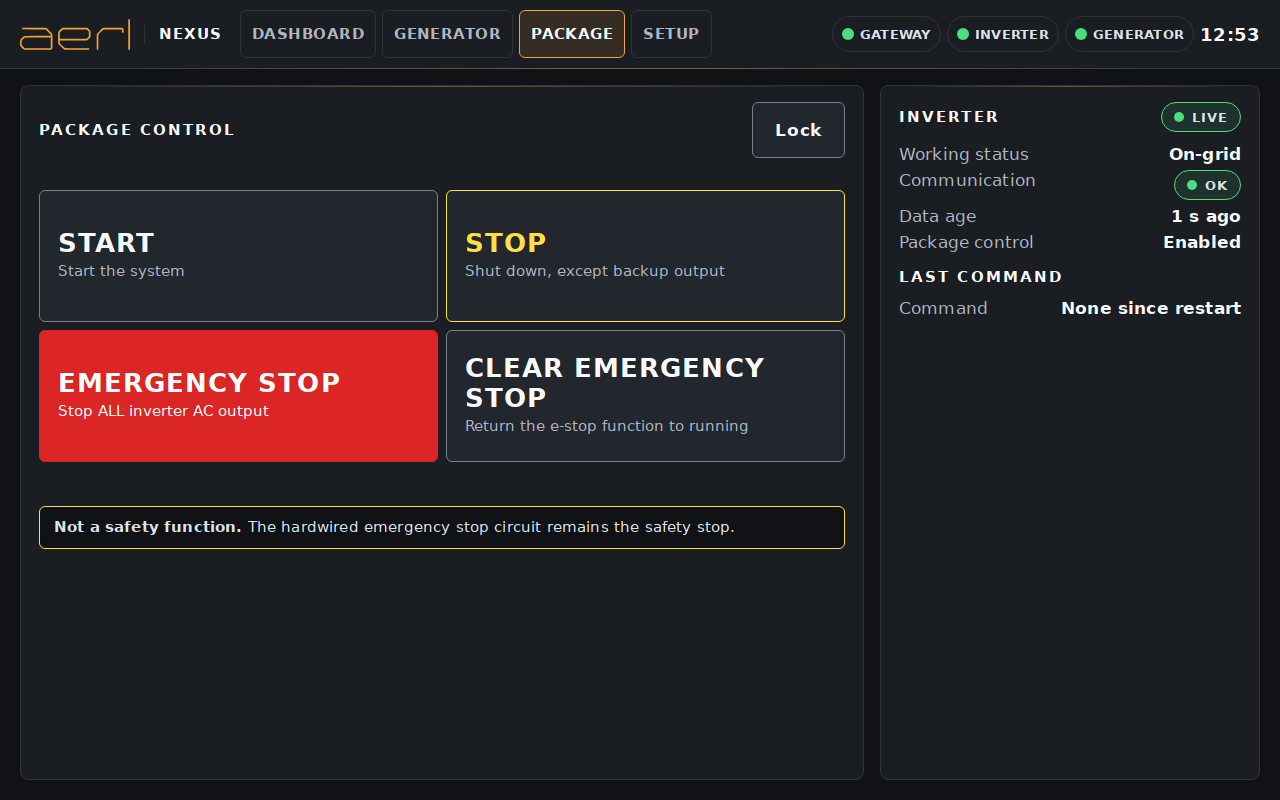
Package control is not a safety function. The hardwired emergency stop circuit remains the safety stop.
| Button | What it does |
|---|---|
| Start | Start the system. Confirm only when it is safe to energise the system. |
| Stop | Shut down, except backup output. The site supply may be affected. |
| Emergency stop | Stop ALL inverter AC output. You are asked to confirm twice ("Yes, emergency stop"). |
| Clear emergency stop | Return the e-stop function to running. |
The panel beside the buttons shows the inverter's Working status, Communication, Data age and whether Package control is Enabled or Switched off, and the last command: its Command, Counter, Result (Accepted, Rejected by inverter, or No reply from inverter), Source (SCADA, or This touchscreen) and when it was Sent.
A command that has no reply may or may not have been applied: check the inverter's working status before you send it again. The Nexus HMI never repeats a command by itself.
The Generator screen appears once a generator is added (see Adding the Generator in the Devices chapter). It controls the generator through its controller, and needs the PIN. Quiet hours opens the quiet hours page, and Generator control comes back.
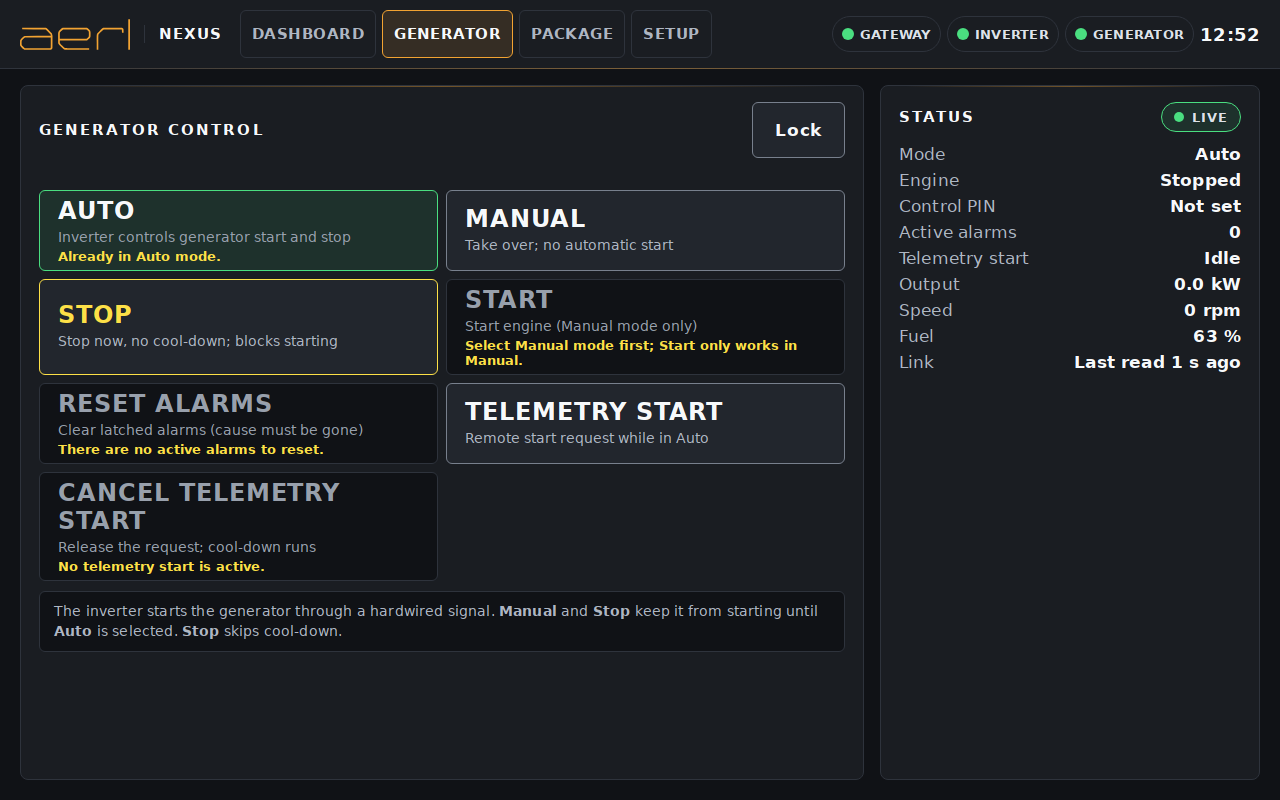
| Button | What it does |
|---|---|
| Auto | The inverter controls generator start and stop |
| Manual | Take over: no automatic start |
| Stop | Stop now, no cool-down; blocks starting |
| Start | Start engine (Manual mode only) |
| Reset alarms | Clear latched alarms (the cause must be gone) |
| Telemetry start | Remote start request while in Auto |
| Cancel telemetry start | Release the request; the cool-down runs |
Every command opens a confirmation that states its consequence, for example "Make sure the area around the generator is clear." before a start, or "Only reset after the cause has been checked." before an alarm reset. Touch the confirm button to send it.
The inverter starts the generator through a hardwired signal. Manual and Stop keep it from starting until Auto is selected again. Stop skips cool-down.
A command that cannot be sent is greyed, with the reason under it: for example "Already in Auto mode.", "Select Manual mode first; Start only works in Manual.", or "There are no active alarms to reset." Control is also unavailable while the generator's data is stale or disconnected, while Panel control is switched off (Devices > Generator), or while the generator controller's control PIN is missing or has been rejected.
The panel beside the buttons shows the generator's Mode, Engine state, Control PIN state, Active alarms, Telemetry start, Output, Speed, Fuel and Link, the quiet hours state, and the result of the last command as the Nexus HMI follows it (for example cranking, running up, running, or failed to start).
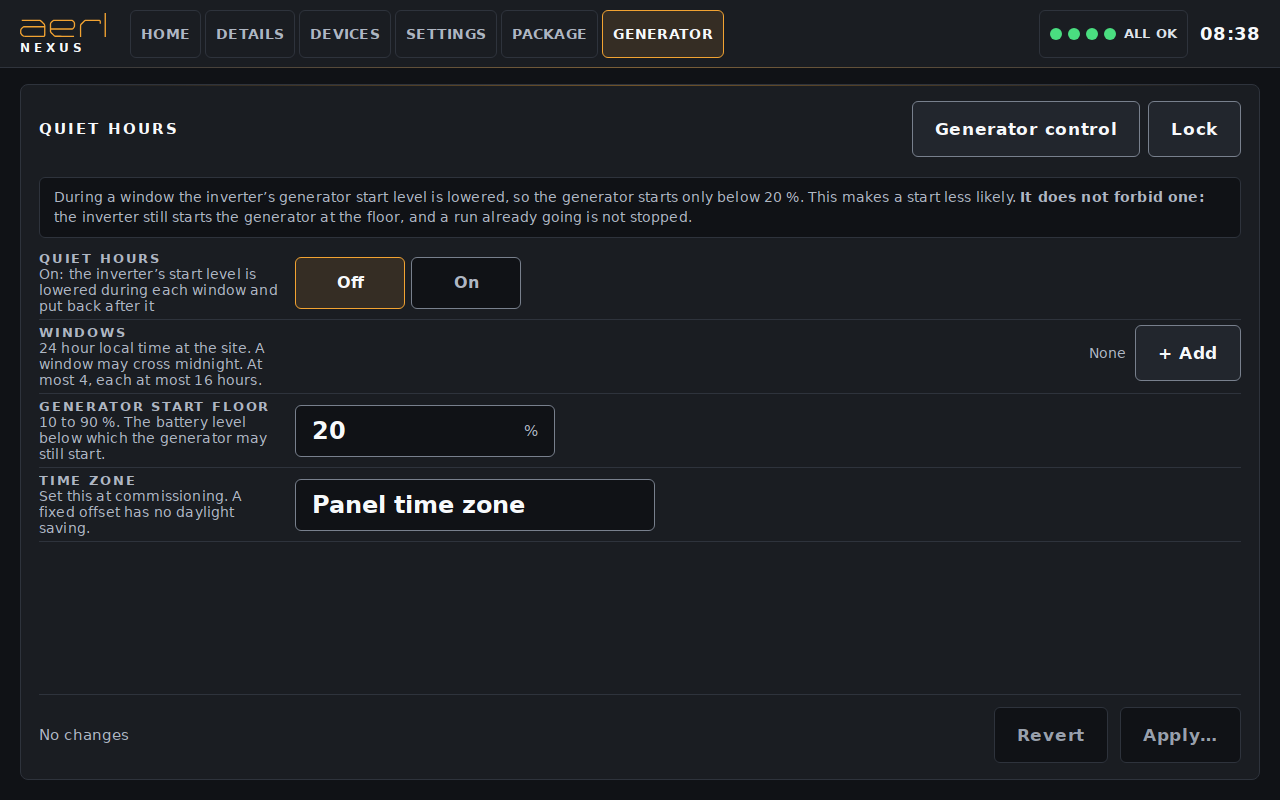
During a quiet-hours window the inverter's generator start level is lowered, so the generator starts only below the generator start floor. This makes a start less likely. It does not forbid one: the inverter still starts the generator at the floor, and a run already going is not stopped.
Touch Apply… and confirm. Quiet hours need the Nexus HMI's clock to be right: until it is, the page says "Quiet hours are not active: the panel has no trusted clock yet."
If a start is requested from this screen during quiet hours, the confirmation says so. A telemetry start is held back once: the screen says "Quiet hours are active" and offers Start anyway or Do not start.
The Nexus HMI shows a banner across the top of the screen, or a word in the header status, when something is wrong. It keeps trying in the background and recovers by itself when the cause is fixed. Touch the header status to see which device needs a look.
| What the screen shows | What to do |
|---|---|
| "The screen has lost contact with the Nexus. Retrying… Values below are not live." | The Nexus HMI's own software is restarting. Wait a minute. If it stays, switch the Nexus HMI off and on again. |
| "The gateway is not responding. Waiting for it to come back…" | As above. If it stays after a restart, contact AERL support. |
| "Settings cannot be read from the gateway." | Wait a minute and open the screen again. If it stays, contact AERL support. |
| Find: "Nothing found on LAN 1", or "That LAN port has no network address." | Check the port's cable, and that the devices have power and are on that port's network. Try the other port, or add the device by hand. |
| "Lost: no reply" or "Lost: the device cannot be reached on the network", or a Home tile showing "No reply" | Check the device's power, its cable and the switch. If its address may have changed, touch Find again, then Update IP. |
| "Lost: device busy, another client is polling it" | Another Modbus client is reading the device. Disconnect it: the Nexus HMI must be the device's only client. |
| "Different device at this address" | Another device now has this device's address. Run Find devices and use Update IP. |
| Battery tile "BMS no reply · from inverter" | The battery's data logger is not answering, so Home shows the inverter's battery values. Check its power and cable, then Devices. |
| "Inverter: Ethernet and RS-485 links are both down." (or Generator) | Check the device has power, the Ethernet cable and switch, the RS-485 wiring, and the device's settings (Devices > Edit). |
| Generator buttons greyed | Read the reason under each button. Check that Panel control is on (Devices > Generator), that the Control PIN is Accepted, and that the generator's data is live. |
| Control PIN Rejected or Locked out | Enter the correct generator controller PIN (Devices > Generator). After a lock-out, wait for it to clear before you try again. |
| "Generator will not start from the inverter: the controller is in Manual mode." | Select Auto on the Generator screen when the inverter should control the generator. |
| What the screen shows | What to do |
|---|---|
| Package buttons greyed | Switch on package control (Settings > Package control), and check that the inverter's data is live. |
| "Package control is not available.", "This Nexus does not offer package control yet. A software update is needed." or "Control is not available: the controller is not running on this Nexus." | Contact AERL support. |
| "Dry run: commands are logged, not sent." | Choose Off or On for package control (Settings > Package control) or Panel control (Devices > Generator) to leave the dry run. |
| "A router already hands out addresses on that port, so this panel will not." | Standalone is only for a network of its own. On a network with a router, use DHCP. |
| "LAN 1: this panel stopped handing out addresses, because a router appeared." | A router was connected to the standalone port's network, and the port is back on DHCP. Touch Review. |
| "Network change on LAN 1 not confirmed. It will be undone within 2 minutes." | Touch Review, then Keep or Undo. |
| "LAN 1: the gateway … is not answering, so remote support may not work." | Check the gateway address (Settings > Network) and the router. |
| Lost network access after a network change | Touch Undo, or wait 2 minutes: the previous setting is restored by itself unless you touched Keep. |
| Cloud Offline | Check the site's internet connection. Readings are kept on the Nexus HMI and sent when the connection is back. |
| "Session expired. Enter PIN again." | Enter the PIN again. |
| "Too many attempts. Try again in … s." | Wait, then enter the correct PIN. |
| The clock, or the times in the event log, are behind after a power cut | After a power cut, the Nexus HMI's clock can be behind until it reaches the internet. With no internet connection it stays behind. |
If your situation is not covered here, contact AERL support on 1800 950 865 or at [email protected]. Have the Nexus HMI's serial number, the panel software version (Settings > Cloud & software) and a photo of the screen ready.
The Nexus HMI has a 2-year warranty. It starts 30 days after AERL dispatches the Nexus HMI, or on the day it first connects to AERL Cloud if that is sooner.
Register your Nexus HMI at aerl.com.au/warranty-registration. Registration does not change the 2-year warranty.
Our goods come with guarantees that cannot be excluded under the Australian Consumer Law. You are entitled to a replacement or refund for a major failure and compensation for any other reasonably foreseeable loss or damage. You are also entitled to have the goods repaired or replaced if the goods fail to be of acceptable quality and the failure does not amount to a major failure.
The full terms and the claim procedure are in the AERL Nexus HMI (HMI-10) Warranty Statement, at aerl.com.au.
| Revision | Date | Change |
|---|---|---|
| 1.0.0 | 11 / 2026 | First issue. |
| 1.1.0 | 11 / 2026 | Rewritten for the Nexus HMI software that ships on all units: Home energy diagram, Details, Devices (Find devices, devices remembered by serial number, Update IP, the follow setting, the generator add-on), Settings (standalone network, SCADA off by default, package control switch), quiet hours on the Generator screen. |
| 1.1.1 | 11 / 2026 | HMI-10 renamed Nexus HMI. |
If you have any questions or need support, contact AERL.
Sincerely,
The AERL Team
AERL Pty Ltd · 1/75 Bluestone Circuit, Seventeen Mile Rocks QLD 4073 · 1800 950 865 · [email protected] · aerl.com.au
Australian Energy Research Laboratories
1/75 Bluestone Circuit
Seventeen Mile Rocks QLD 4073
Australia