 Download PDF· Rev 2.1.0
Installation and Operation User Manual
Nexus Gateway
Nexus Lite · Nexus 4G
NEXUS-LITE · NEXUS-4G
Installation and Operation User ManualRev 2.1.0, 8 Nov 2026
Download PDF· Rev 2.1.0
Installation and Operation User Manual
Nexus Lite · Nexus 4G
Australian Energy Research Laboratories (AERL) was founded in 1985 by Stuart Watkinson to commercialise the Power Optimizer, which he developed while studying at the University of Queensland. It became the AERL MAXIMIZER™, a universal maximum power point tracker (MPPT).
Today AERL designs, integrates and supports power conversion, lithium energy storage, monitoring and earth-fault detection products for commercial, industrial and off-grid energy systems, including oil and gas, mining and telecommunications sites.
AERL and the AERL logo are trademarks owned by AERL Holdings Pty Ltd and used by AERL Pty Ltd under licence. These trademarks may be registered in Australia and other countries. Selectronic, SP PRO, SP LINK, Pylontech, Deye and other third-party names are trademarks of their respective owners; they are used here only to identify compatible equipment.
November 2026 (11/2026)
AERL Nexus Gateway User Manual © 2026 AERL Pty Ltd. All rights reserved.
UNLESS SPECIFICALLY AGREED TO IN WRITING, AERL PTY LTD:
(a) MAKES NO WARRANTY AS TO THE ACCURACY, SUFFICIENCY OR SUITABILITY OF ANY TECHNICAL OR OTHER INFORMATION PROVIDED IN ITS MANUALS OR OTHER DOCUMENTATION.
(b) ASSUMES NO RESPONSIBILITY OR LIABILITY FOR LOSS OR DAMAGE, WHETHER DIRECT, INDIRECT, CONSEQUENTIAL, OR INCIDENTAL, WHICH MIGHT ARISE OUT OF THE USE OF SUCH INFORMATION.
THE USE OF ANY SUCH INFORMATION WILL BE ENTIRELY AT THE USER'S RISK.
Australian Energy Research Laboratories, 1/75 Bluestone Circuit, Seventeen Mile Rocks QLD 4073, Australia
aerl.com.au · [email protected] · [email protected] · 1800 950 865
This manual contains important safety information and installation instructions for the AERL Nexus Gateway: the Nexus Lite and the Nexus 4G. It uses the following symbols for important operating information and potentially dangerous conditions.

Indicates information that must be followed to ensure proper operation of the Nexus.

Indicates a critical procedure for the safe installation of the unit, or safety information that must be followed.
This manual gives installation and operating instructions for the Nexus Lite and the Nexus 4G. Everything in it applies to both models except the Nexus 4G chapter, which covers what only the Nexus 4G has. Read all of its instructions and cautions before you start the installation.
Only qualified electricians and technicians may install the Nexus.
Do not disassemble or attempt to repair this product unless you are qualified and have written permission from AERL to do so.
AERL will not be held responsible in any way for mishandling of this product or for installation of the product in a manner that does not comply with the instructions in this manual.
The AERL Nexus Gateway is a communications gateway for remote monitoring, configuration and control of distributed energy systems. It connects field equipment (solar charge controllers, batteries, inverters and other compatible CAN bus and Modbus devices) to AERL Cloud, where data can be viewed, alerts set up and equipment managed from anywhere.
Its main features are:
| Model | What it has |
|---|---|
| Nexus Lite (NEXUS-LITE) | The Nexus Gateway (formerly sold as Nexus): CAN bus, RS485, Ethernet and Wi-Fi |
| Nexus 4G (NEXUS-4G) | Everything the Nexus Lite has, plus an integrated 4G cellular modem with a SIM card slot, digital inputs and output relays |
The serial number and pin code printed on the Nexus label are needed to claim the Nexus in AERL Cloud. Keep the label accessible during commissioning.
The complete specifications are in the Nexus Gateway datasheets (Nexus Lite and Nexus 4G).
| Parameter | Nexus Lite | Nexus 4G |
|---|---|---|
| Part number | NEXUS-LITE | NEXUS-4G |
| Weight | 350–400 g | — |
| Dimensions (W × H × D) | 105 × 160 × 35 mm | — |
| Enclosure type | Indoor Type 1 / IP20 | Indoor Type 1 / IP20 |
| Mounting method | Wall or DIN rail | Wall or DIN rail |
| Operating temperature | −20 to 50 °C | −20 to 50 °C |
| Storage temperature | −40 to 70 °C | −40 to 70 °C |
| DC power input | 12–60 Vdc (galvanically isolated) | 12–60 Vdc (galvanically isolated) |
| USB-C power input | 5 V (power only) | 5 V (power only) |
| Power consumption | 5 W | 7 W |
| Warranty | 2 years | 2 years |
| Interface | Nexus Lite | Nexus 4G |
|---|---|---|
| CAN bus | 2 × RJ45 (linked internally), galvanically isolated, no built-in termination, 500 kbps | As Nexus Lite |
| RS485 Modbus | 1 × RJ45, galvanically isolated | As Nexus Lite |
| Ethernet | 1 × RJ45 | 1 × RJ45 |
| Wi-Fi | Dual band | Dual band |
| 4G cellular | — | Yes, SIM card slot |
| Digital inputs and output relays | — | Yes |
| Encryption | SSL/TLS | SSL/TLS |
In a system with an RS485 (Modbus) device such as a Selectronic SP PRO, mount the Nexus as close as possible to that device, so that the RS485 run is short.
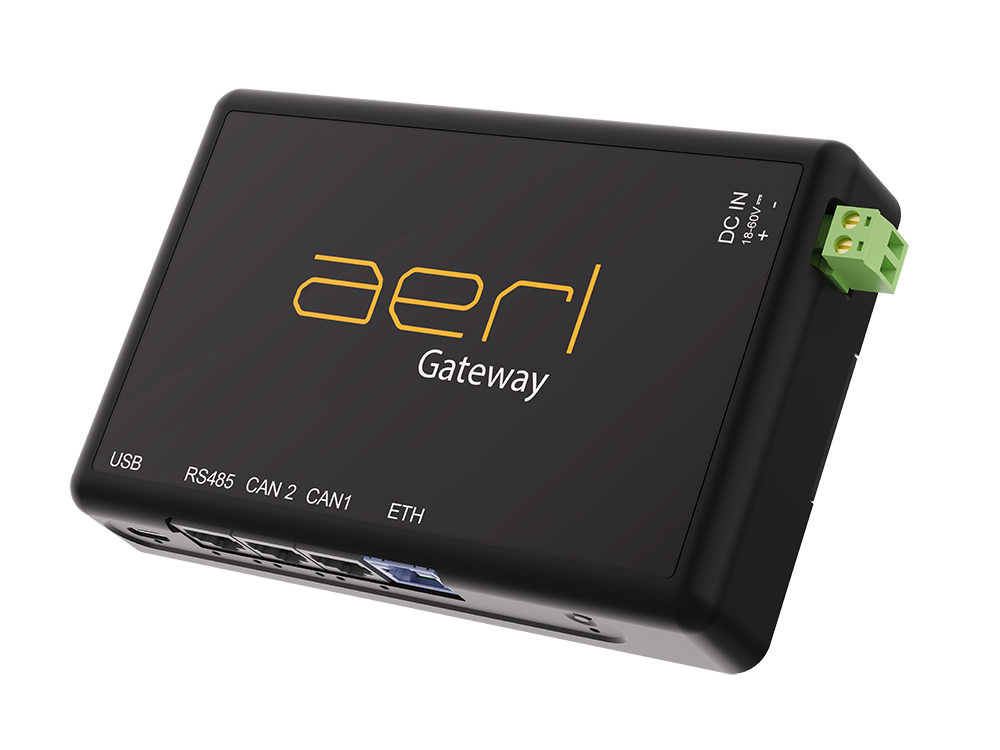
Mount the Nexus on a wall, using the mounting flanges, or on a 35 mm DIN rail. Mount it with the connectors facing downwards or sideways, so that cables leave the connectors without strain.
| Label | Connector |
|---|---|
| DC IN + − | DC power input, 2-pole pluggable terminal |
| USB | USB-C, 5 V power input only |
| Label | Connector |
|---|---|
| RS485 | RS485 Modbus RTU, RJ45 |
| CAN 2, CAN1 | CAN bus, RJ45 × 2, linked inside the Nexus |
| ETH | Ethernet, RJ45 |
The Nexus 4G also has an LTE antenna connector, a SIM card slot, HDMI, RST and an RLY / IO terminal: see the Nexus 4G chapter.
The Nexus can be powered from either of two inputs: use only one at a time. Use the DC input for a permanent installation. Connect a DC supply between 12 V and 60 V to the DC IN terminal. The input is galvanically isolated from the rest of the Nexus.
| Pin | Function |
|---|---|
| 1 (+) | 12–60 Vdc input |
| 2 (−) | Ground |
The input is protected against reverse polarity, but confirm the polarity before you apply power. Prolonged incorrect connection may damage the input stage.
For bench or commissioning use, connect a 5 V USB-C supply to the USB port. The USB-C port is a power input only: it is not a data connection.
The Nexus starts automatically when power is applied. It then:
The Nexus has two CAN bus sockets and one RS485 Modbus socket, all RJ45. Use CAT5e or CAT6 patch leads, shielded for CAN runs, and keep data cables away from DC power cables.
The CAN interface runs at a fixed 500 kbps, matching the AERL device family. Every device on the bus must use 500 kbps.
| Pin | Function |
|---|---|
| 4 | CAN High |
| 5 | CAN Low |
| 6 | Ground |
All pins not listed are not connected.
The RS485 port connects a Modbus RTU device, such as a Selectronic SP PRO inverter. The Nexus is the Modbus master: do not put another Modbus master on the same link.
| Pin | Function |
|---|---|
| 3 | RS485 A |
| 6 | RS485 B |
| 8 | Ground |
All other pins are not connected. The RS485 port is galvanically isolated. Follow the device manufacturer's wiring guidance, and terminate the bus correctly at both ends.
Two LEDs next to the RS485 socket, Tx and Rx, show the link working: Tx flickers when the Nexus sends a Modbus request, Rx when the device replies.
CAN devices are found automatically. A Modbus device is added to the Nexus in AERL Cloud (see the AERL Cloud chapter); AERL Cloud allows one Modbus device per gateway.
| Equipment | Connection | Set-up |
|---|---|---|
| AERL CoolMax SRX and SRX-R solar charge controllers | CAN | Below |
| AERL LiFe² 5120S battery | CAN | Below |
| AERL Kakadu 120 battery | CAN | Below |
| AERL Battery Sense | CAN | Through the CoolMax SRX: below |
| Pylontech US5000, XESS ION 5120 batteries | CAN | On the battery's CAN bus |
| Selectronic SP PRO 2i inverter | RS485 | Below |
| Deye Hybrid Inverter LV 3P | RS485 | Added in AERL Cloud as a Modbus device |
| ABB Upscale UPS | SNMP, over the network | Set up in AERL Cloud |
| AERL CP-30, AERL EarthGuard | — | Contact AERL |
The current list of supported equipment is on the AERL Cloud help site, docs.aerl.cloud (Devices).
Connect a Nexus CAN socket to a CANBUS RJ45 socket on the CoolMax SRX (inside the access cover) or on the SRX-R backplane, with a straight-through patch lead. Run the bus on through the other SRX units from their second CANBUS socket. Enable the 120 Ω termination switch on the last SRX on the bus only. Leave the SRX CAN bus speed at its default, 500 kbps.
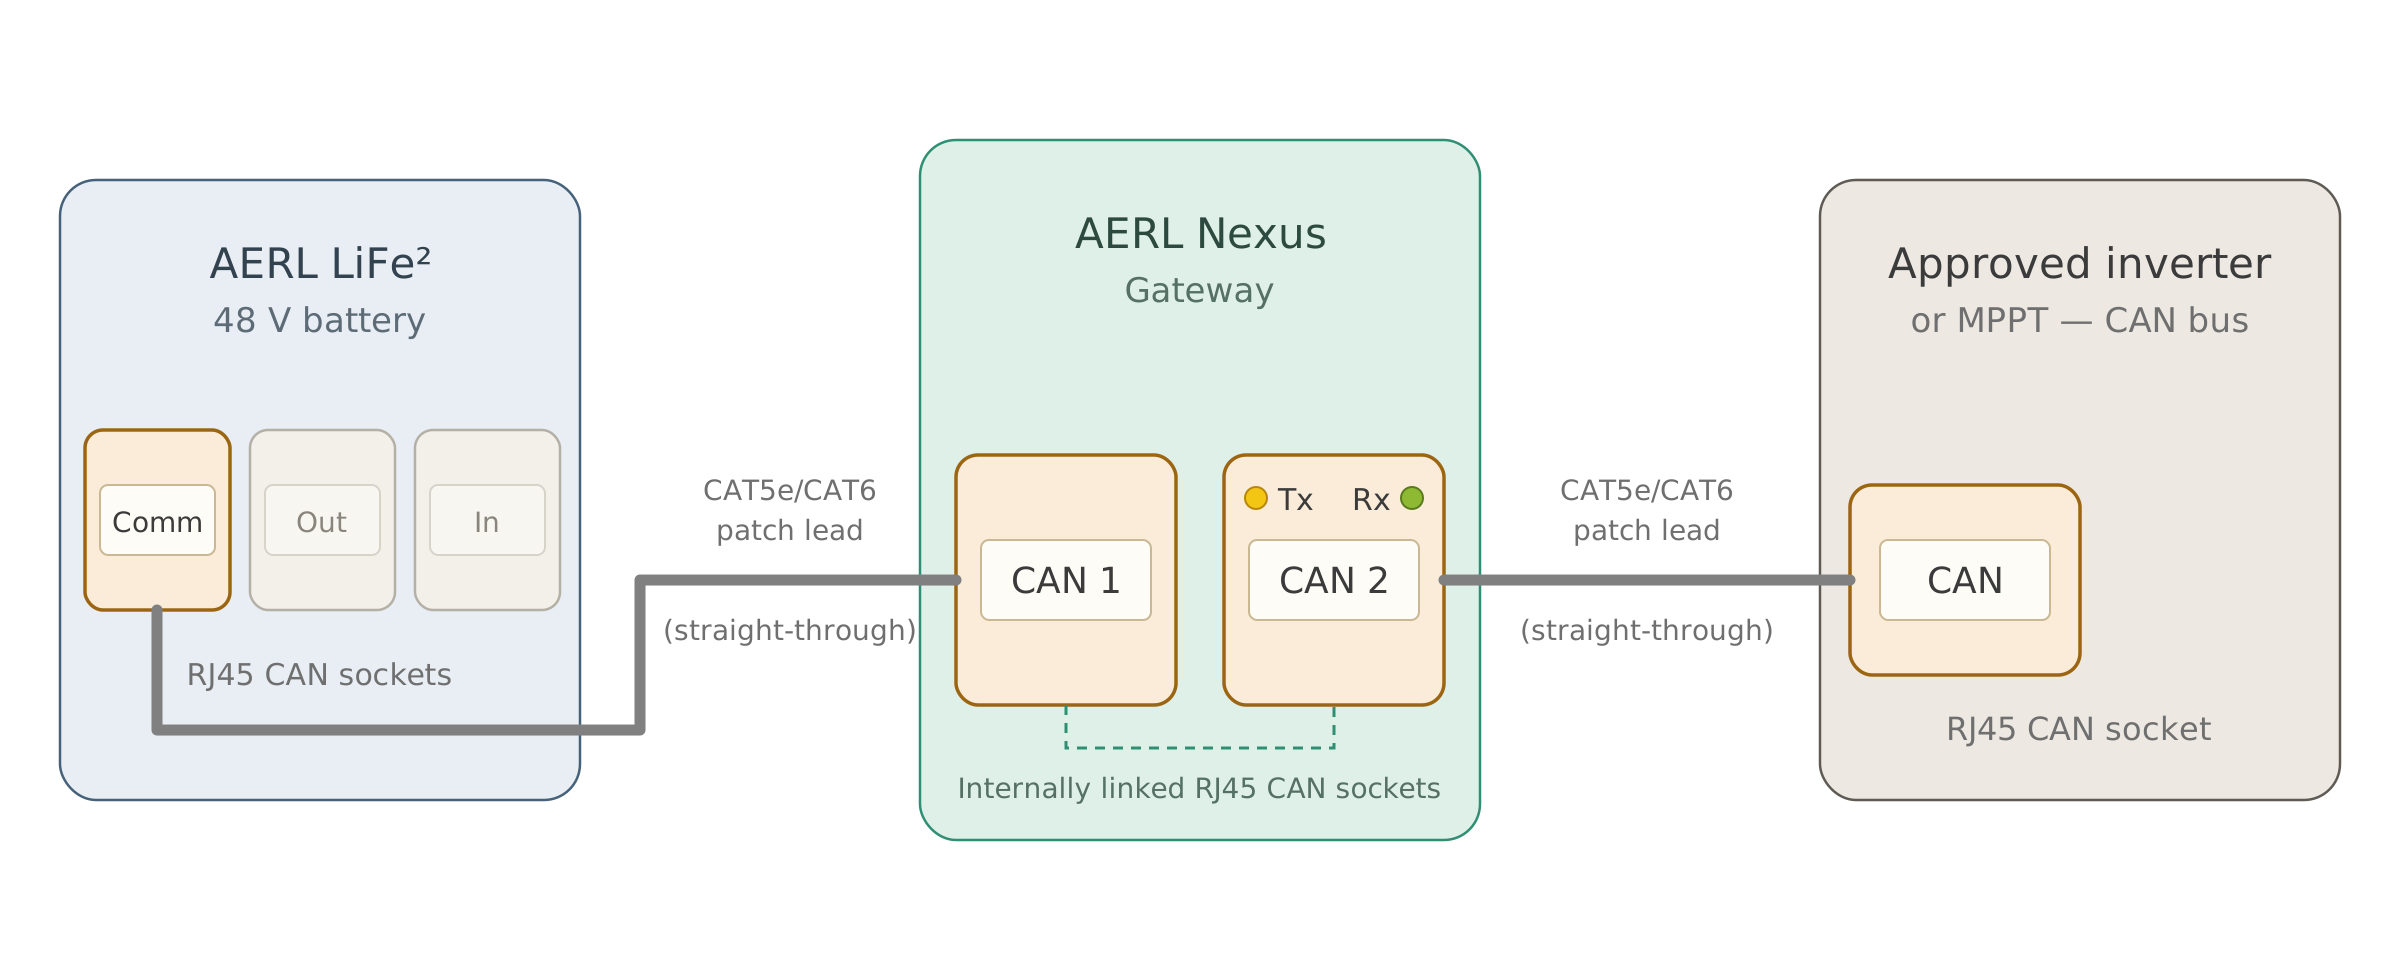
Connect the Nexus inline on the battery's CAN bus: the master battery's COMM port to Nexus CAN 1, and Nexus CAN 2 on to the inverter or MPPT. The master battery's COMM port has an internal 120 Ω termination, so the battery is one end of the bus. If the Nexus is the other end, fit a 120 Ω termination plug in its spare CAN socket. The LiFe² AERL Cloud Integration Guide has the details.
The Kakadu 120 needs a Nexus Gateway to manage its communications. Connect the INV port of the master BMS to a Nexus CAN socket. The Master Unit setting on that BMS sets its terminating resistor; on every other BMS it is off. For a Kakadu system with Selectronic SP PRO inverters, follow the Kakadu 120 commissioning guide for the SP PRO SPLC1202 and CoolMax SRX.
Connect a straight-through CAT5e or CAT6 patch lead from Port 1 on the SP PRO's comms card to the Nexus RS485 socket. In SP LINK, switch Modbus on with Modbus address 1, 9600 baud, 8 data bits, no parity, 1 stop bit, then add the SP PRO to the Nexus in AERL Cloud. On a PowerChain system, connect to the PowerChain master. The Nexus Gateway SP PRO Setup Guide has the full procedure.
The Battery Sense connects to a CANBUS socket on a CoolMax SRX, as its manual describes. When the Nexus is on the same CAN bus, the Battery Sense readings appear in AERL Cloud. If the Battery Sense is the last device on the bus, set its 120 Ω termination switch to ON.
The HMI-10 has the Nexus software built in: it does not connect to a Nexus Gateway. See the AERL Industrial HMI (HMI-10) User Manual.
The Nexus needs internet access to send its data to AERL Cloud.
Connect a Cat5e or better Ethernet cable from the site router or switch to the ETH port. The Nexus gets its address by DHCP and connects to AERL Cloud on its own: no further configuration is needed. The cable can be plugged in before or after power-on. Ethernet is recommended for permanent installations.
The Nexus has dual-band Wi-Fi. Wi-Fi is not set up from AERL Cloud: if Ethernet is not available at the site, contact AERL for help with a Wi-Fi set-up. Have the Nexus serial number and the site's Wi-Fi network name ready.
The Nexus starts every connection itself: no inbound ports need to be opened. The network must allow outbound HTTPS (TCP port 443) to AERL Cloud services (aerl.cloud), and network time (NTP). If the site's network filters outbound traffic, contact AERL support for the list of addresses to allow.
The Nexus detects the type of connection it has. It sends data every minute on Ethernet or Wi-Fi, and every ten minutes on a cellular connection (Nexus 4G). During a network outage it stores data locally and uploads it automatically once it reconnects.
Once the Nexus is powered, online and wired to the field equipment, claim it in your AERL Cloud organisation. Its data is visible only after it is claimed.
You need the Owner, Admin or Technician role in the organisation to claim a gateway.
There is nothing to configure on the Nexus itself: it connects to AERL Cloud with credentials set at manufacture. If a gateway has been claimed by the wrong organisation by mistake, contact AERL support.
To give a customer or colleague access, invite them from the organisation's Invitations page in AERL Cloud and choose their role.
The AERL Cloud help site, docs.aerl.cloud, covers organisations, locations, users, alerts and reports:
The Nexus 4G is the Nexus Gateway with an integrated 4G cellular modem, digital inputs and output relays. Everything else in this manual applies to it unchanged.
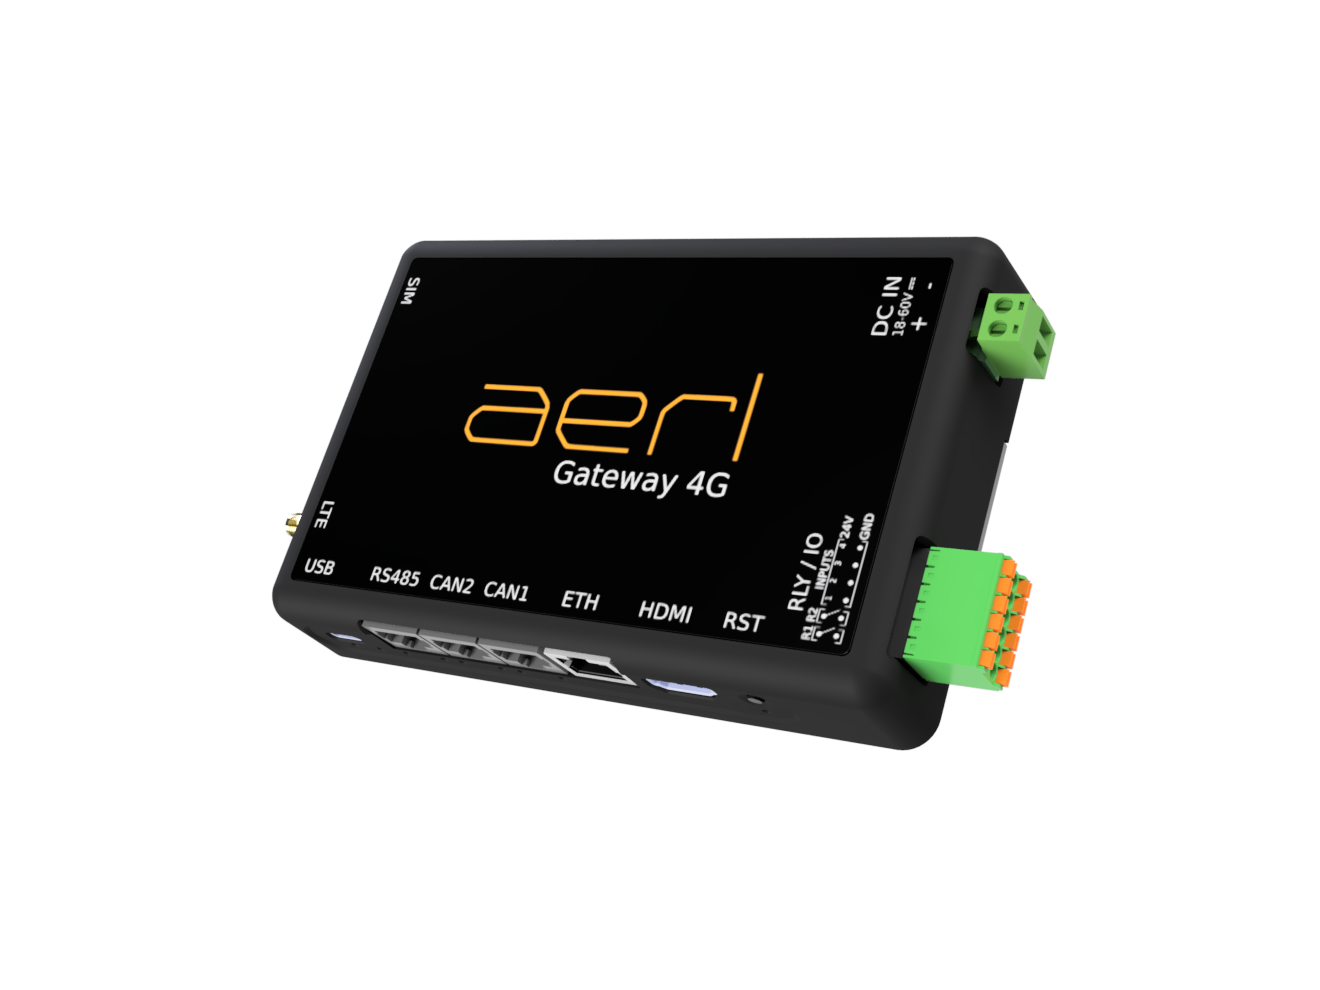
The Nexus 4G takes a Micro-SIM in the SIM slot. Use a SIM with a data plan that covers the site.
Contact AERL before you commission a Nexus 4G on cellular: AERL confirms the SIM and the network settings it needs.
Connect the LTE antenna to the LTE connector, and place the antenna where the cellular signal is best, outside any metal enclosure.
On a cellular connection the Nexus 4G sends its data every ten minutes, to keep the data used low. AERL Cloud shows the Nexus 4G online once it has reported in the last 15 minutes, as for any gateway.
The RLY / IO terminal carries two output relays (R1, R2) and four digital inputs. The relays are for SELV circuits only: 30 V DC or 24 V AC at most, 3 A.
Contact AERL before you wire the RLY / IO terminal. Never connect mains voltage to the relays or the inputs.
Once claimed and connected, the Nexus works on its own. It:
No interaction with the Nexus itself is needed. All monitoring and configuration is done in AERL Cloud.
The Nexus updates itself automatically while it is connected to AERL Cloud: no installer action is needed. Updates are installed at a quiet time; the Nexus restarts to finish an update and is offline for a short time. If an update does not work, the Nexus goes back to the previous version by itself.
Firmware updates for connected AERL equipment, such as CoolMax SRX controllers, are started from AERL Cloud: see the AERL Cloud help site.
The Nexus is monitored from AERL Cloud. On the Gateways page each gateway shows its Status and Last Seen time; its Manage window shows its Hub ID and software (Firmware) version.
Equipment on a gateway shows Online, Sleeping (normal for a CoolMax SRX that is quiet overnight), Offline or Inactive.
| Symptom | Check |
|---|---|
| The Nexus does not power up | DC input within 12–60 Vdc and the polarity correct; the DC IN plug fully home; or the 5 V USB-C supply fully seated. |
| The Nexus has never come online | The Ethernet cable goes to a port with internet access; outbound HTTPS (port 443) is allowed; the right serial number was claimed. Nexus 4G on cellular: SIM, data plan and antenna. |
| Symptom | Check |
|---|---|
| The Nexus was online and went offline | Power, the network or cellular link, and the site firewall. The Nexus retries by itself and uploads the stored data when it reconnects. Note the Last Seen time. |
| No CAN devices appear | The Nexus is online; the devices are powered and wired to CAN 1 or CAN 2; CAN High, CAN Low and ground on pins 4, 5 and 6 of each lead; every device runs at 500 kbps; the bus is terminated at both ends. |
| CAN devices drop in and out (CAN errors) | Exactly two 120 Ω terminations on the bus, one at each end; shielded cable; data cables away from power cables; loose or damaged RJ45 plugs. |
| Modbus device shows no data; Tx LED not flickering | The Nexus is online and the Modbus device has been added to it in AERL Cloud. |
| Tx flickers, Rx does not | The cable goes to the right port on the device; a straight-through lead; the device is powered; its Modbus address, baud rate and format (SP PRO: 1, 9600, 8N1). |
| Tx and Rx flicker, no data in AERL Cloud | The product chosen in Edit Gateway matches the device, and the device's Modbus settings match it. |
For alarm codes and faults of the connected equipment, see the AERL Cloud help site, docs.aerl.cloud/troubleshooting.
If these checks do not solve the problem, contact AERL support on 1800 950 865 or at [email protected]. Have the Nexus serial number (or Hub ID) and the time it went offline ready.
The AERL Nexus is designed and tested to applicable Australian electrical and electromagnetic compatibility standards for Class B information-technology equipment installed indoors. Refer to the markings on the unit and the accompanying declaration of conformity for the standards covered by your unit's revision.
The Nexus Lite and the Nexus 4G have a 2-year warranty. It starts 30 days after AERL dispatches the Nexus, or on the day it first connects to AERL Cloud if that is sooner.
Register your Nexus at aerl.com.au/warranty-registration. Registration does not change the 2-year warranty.
Our goods come with guarantees that cannot be excluded under the Australian Consumer Law. You are entitled to a replacement or refund for a major failure and compensation for any other reasonably foreseeable loss or damage. You are also entitled to have the goods repaired or replaced if the goods fail to be of acceptable quality and the failure does not amount to a major failure.
The full terms and the claim procedure are in the AERL Nexus Gateways Warranty Statement, at aerl.com.au.
Record the details from your Nexus label here:
| Detail | Value |
|---|---|
| Model | |
| Serial number | |
| Installed on |
| Revision | Date | Change |
|---|---|---|
| 2.1.0 | 11 / 2026 | First issue. |
If you have any questions or need support, contact AERL.
Sincerely,
The AERL Team
AERL Pty Ltd · 1/75 Bluestone Circuit, Seventeen Mile Rocks QLD 4073 · 1800 950 865 · [email protected] · aerl.com.au
Australian Energy Research Laboratories
1/75 Bluestone Circuit
Seventeen Mile Rocks QLD 4073
Australia